Beyond Bubbles: A Guide to Creative Bubble Printing
Table of Contents
- Beyond Bubbles: A Guide to Creative Bubble Printing
- Why Bubble Printing is Perfect for Budding Artists
- Gathering Your Supplies for Bubbly Creations
- Step-by-Step Guide to Bubble Printing Magic
- Beyond the Basics: Expanding Your Bubble Printing Horizons
- Beyond the Bubble: Creative Art Experiences for Kids
- The Science of Bubbles & Art
- Step-by-Step: Bubble Printmaking
- Elevating the Experience: Color & Variation
- Beyond the Print: Expanding Creative Play
- The Science Behind the Bubbles & the Art
- Gathering Your Supplies: A Minimalist Approach
- Step-by-Step Guide to Bubble Printing Magic
- Beyond the Basics: Expanding Your Bubble Printing Horizons
- Cleaning Up & Safety Considerations
Updated May 2025
Have you ever considered transforming the simple joy of bubble blowing into a vibrant art experience? Bubble printing is an accessible and delightfully messy printmaking technique perfect for artists of all ages. It’s a fantastic way to explore color, texture, and the magic of ephemeral art, resulting in truly unique and captivating prints.
This isn’t just about blowing bubbles; it’s about harnessing their fleeting beauty to create lasting artwork. Forget traditional stamps and rollers – we’re embracing the unpredictable charm of bubbly impressions! And for those looking to elevate the experience, pairing this technique with homemade bubble solutions can unlock even more vibrant and long-lasting results.
Why Bubble Printing is Perfect for Budding Artists
Bubble printing offers a unique blend of artistic expression and playful experimentation. Unlike more structured art forms, bubble printing encourages spontaneity and embraces imperfections. Each print is a one-of-a-kind creation, reflecting the unpredictable nature of bubbles themselves. This makes it an excellent activity for fostering creativity, developing fine motor skills, and simply having fun.
Plus, it’s a fantastic way to introduce children to the principles of printmaking without the need for complex equipment or techniques. If you’re looking for more ways to explore printmaking, consider experimenting with different types of paper – a heavier weight cardstock will yield more defined prints.
Gathering Your Supplies for Bubbly Creations
Before you begin, gather the following materials:
Waterproof tablecloth or art mat (to protect your workspace)
Dish soap (acts as a surfactant, creating stable bubbles)
Food coloring or liquid watercolors (for vibrant bubble hues)
Bowl (to mix the bubble solution)
Drinking straw (the bubble-blowing tool)
Pin or needle (to create a controlled airflow)
Sturdy paper (cardstock or watercolor paper works best)
Step-by-Step Guide to Bubble Printing Magic
Follow these steps to create your own stunning bubble prints:
- Prepare the Bubble Solution: In the bowl, combine approximately ½ to 1 inch of water with a few squirts of dish soap. Add several drops of your chosen food coloring or liquid watercolors and gently mix until well combined. Avoid creating excessive foam, as this can interfere with bubble formation.
- Modify the Straw: Carefully poke a small hole halfway down the drinking straw using the pin or needle. This crucial step allows you to blow air out of the straw without accidentally sucking up the bubble solution.
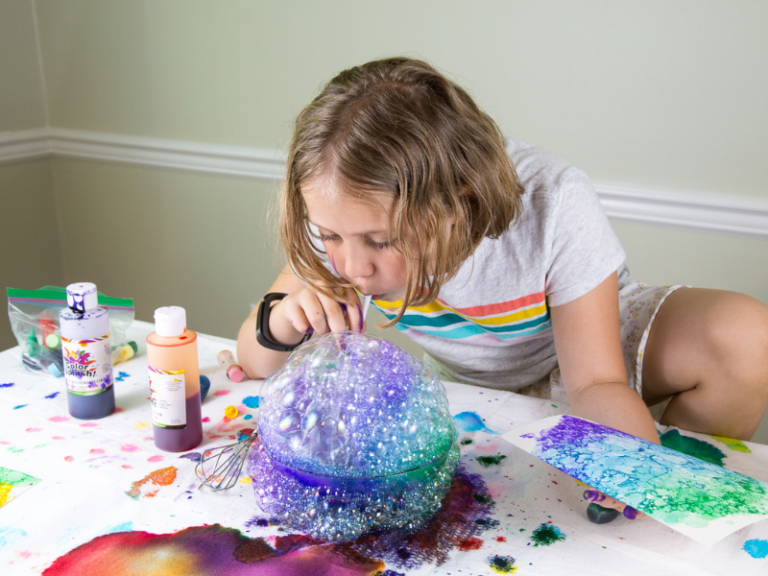
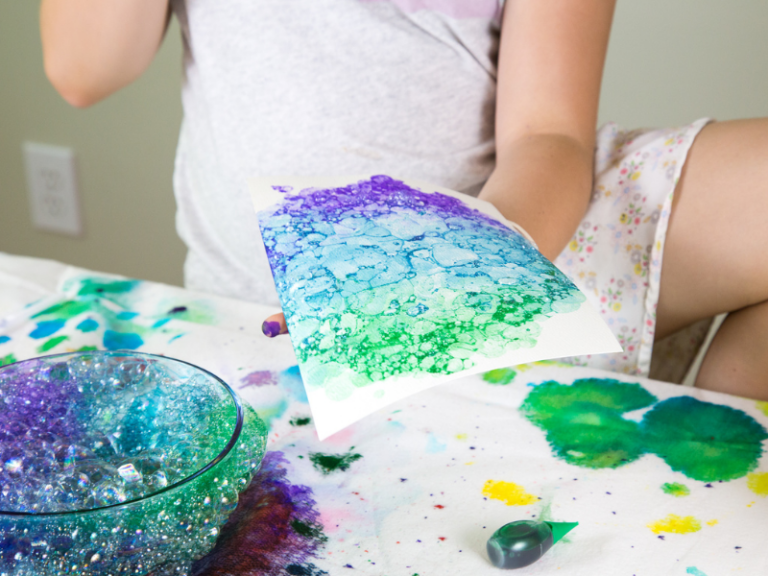
- Blow and Print: Dip the straw into the bubble solution, ensuring the hole is submerged. Gently blow through the straw to create a stream of bubbles. Aim the bubbles towards your chosen paper, allowing them to burst upon contact and leave behind colorful impressions.
- Experiment with Techniques: Don’t be afraid to experiment! Try varying the distance between the straw and the paper, the angle of the bubbles, and the amount of pressure you apply when blowing. You can also layer colors by using different bubble solutions or by blowing bubbles over existing prints.
- Embrace the Imperfections: Remember, bubble printing is all about embracing the unpredictable nature of bubbles. Don’t strive for perfection – instead, celebrate the unique and organic qualities of each print.
Beyond the Basics: Expanding Your Bubble Printing Horizons
Once you’ve mastered the basic technique, consider exploring these creative variations:
Bubble Snakes: For a different bubble-blowing experience, try using bubble snakes! These create long, flowing streams of bubbles that can produce interesting patterns on your paper.
Layered Prints: Create depth and dimension by layering multiple bubble prints on top of each other.
Mixed Media: Combine bubble printing with other art techniques, such as drawing, painting, or collage.
* Bubble Painting: Instead of printing, try blowing bubbles directly onto the paper to create abstract, ethereal paintings.
Bubble printing is more than just an art activity; it’s a celebration of creativity, experimentation, and the simple joys of childhood. So gather your supplies, embrace the mess, and let your imagination run wild! For more inspiration and art ideas, explore our guide to watercolor techniques: https://thetrendytype.com/watercolor-techniques. And if you’re looking for high-quality art supplies, check out our curated selection of art mats: https://thetrendytype.com/art-mats. Don’t forget to explore our range of vibrant liquid watercolors for even more colorful creations: https://thetrendytype.com/liquid-watercolors.
!
Beyond the Bubble: Creative Art Experiences for Kids
Bubbles aren’t just for blowing – they’re a surprisingly versatile medium for artistic expression! This simple activity offers a fantastic opportunity to engage children’s creativity and introduce them to basic printmaking techniques. Forget just chasing and popping; let’s dive into how to transform bubbles into vibrant works of art. According to a recent study by the National Art Education Association, hands-on art experiences like this significantly boost a child’s problem-solving skills and emotional intelligence.
The Science of Bubbles & Art
Before we get to the fun, it’s helpful to understand what makes bubbles so special. A bubble is a thin film of soapy water enclosing air. The iridescent colors you see aren’t in the bubble itself, but are created by the way light reflects off the film’s surface. This same principle of light and reflection can be harnessed to create beautiful, ethereal effects in our art projects.
Step-by-Step: Bubble Printmaking
Here’s how to turn bubble blowing into a captivating art experience:
- Prepare Your Bubble Solution: You can use a store-bought bubble solution or create your own. A simple recipe involves mixing 1 cup of water, 2 tablespoons of dish soap, and 1 tablespoon of glycerin (available at most pharmacies). Glycerin helps create stronger, longer-lasting bubbles.
- Blow Bubbles! Using a straw (or a bubble wand), gently blow bubbles into a shallow dish or onto a flat surface. The key is to create a good layer of bubbles without popping them all immediately.
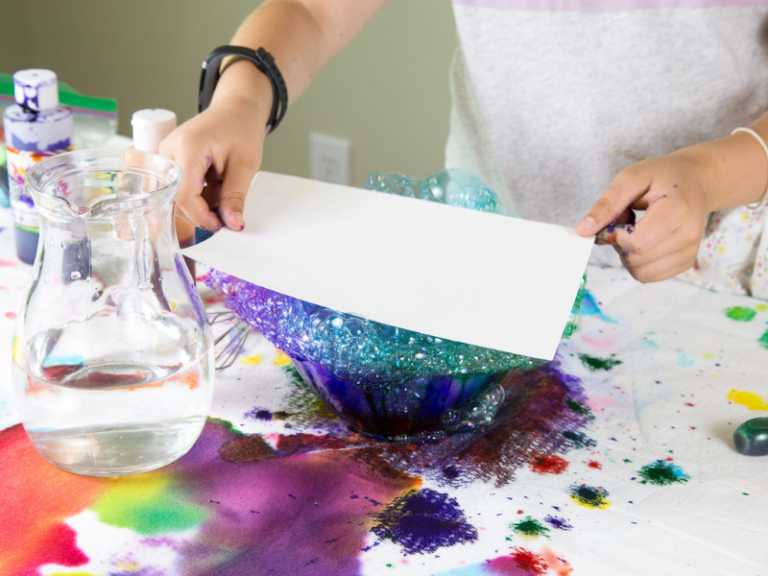
- Capture the Print: Carefully press a piece of paper onto the surface of the bubbles. A light touch is crucial – you want to lift the soapy film onto the paper, not crush the bubbles.
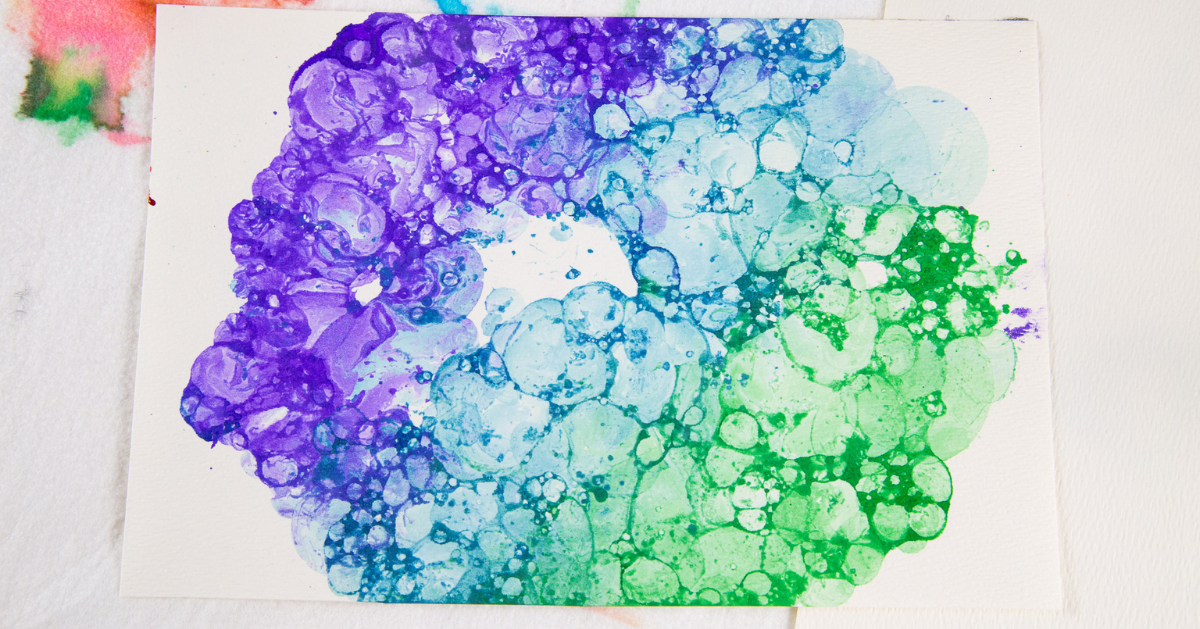
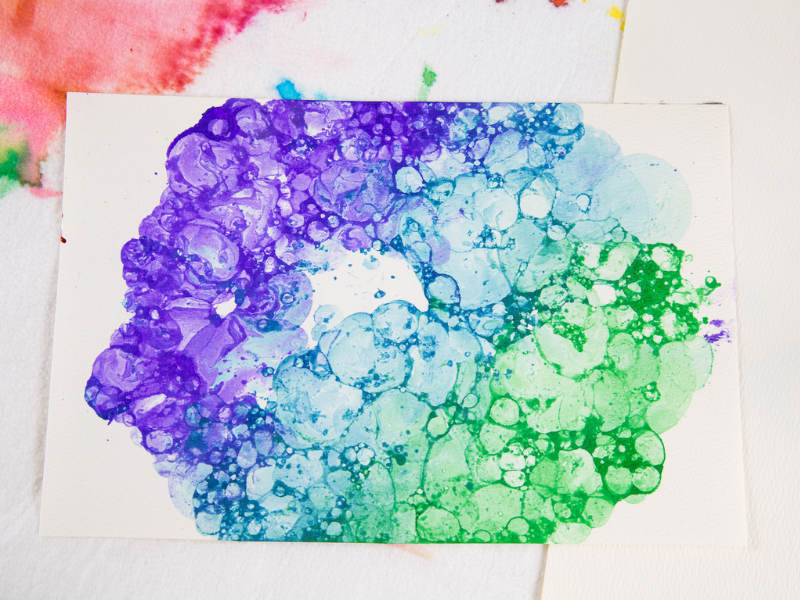
- Reveal Your Masterpiece: Gently lift the paper to reveal the bubble print! You’ll be amazed by the unique patterns and colors created by the soapy film.
- Repeat & Experiment: Continue blowing bubbles and pressing paper onto the surface to create multiple prints. Don’t be afraid to experiment with different colors and techniques!
Elevating the Experience: Color & Variation
Want to take your bubble prints to the next level? Here are a few ideas:
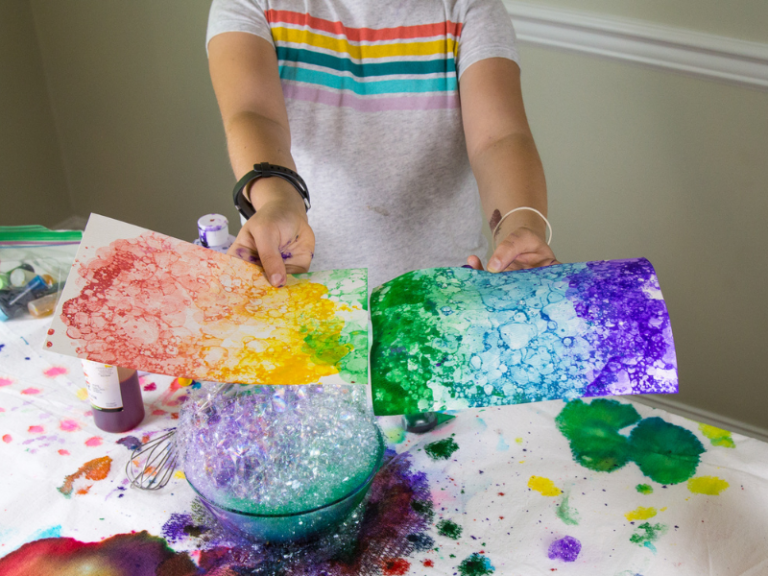
Multiple Colors: Use several bowls of bubble solution, each tinted with a different color of food coloring or liquid watercolor paint. Combine colors on the paper for a vibrant, mixed-media effect.
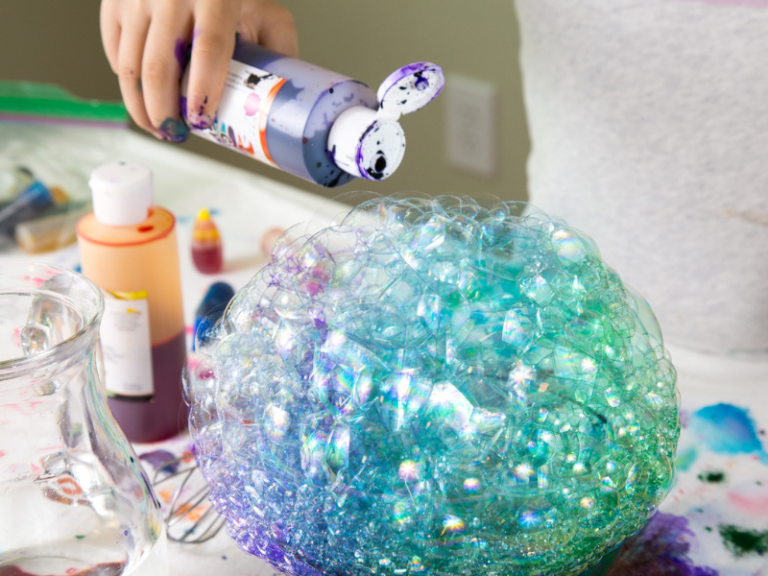
Paint Drops: Add drops of paint directly onto the bubbles before pressing the paper down. This creates a more textured and abstract print.
Paper Variety: Experiment with different types of paper – watercolor paper, cardstock, or even recycled materials – to see how they affect the print.
Layering: Create multiple prints on the same piece of paper, layering colors and patterns to build up a complex design.
Beyond the Print: Expanding Creative Play
Bubble art isn’t just about creating pretty pictures. It’s about fostering creativity, experimentation, and a love of art. Consider these related activities:
Homemade Bubble Solution: Making your own bubble solution is a fun science experiment in itself! It teaches kids about mixtures and solutions.
DIY Bubble Wands: Get crafty and create unique bubble wands using pipe cleaners, beads, and other materials. This encourages problem-solving and fine motor skills.
* Geometric Bubbles: Explore the fascinating world of geometry by creating bubbles in different shapes using specially designed wands.
Ready to dive into a world of bubbly art? Check out our Bubbles Creativity Pack (https://TheTrendyType.com/bubbles-creativity-pack/) for everything you need to get started! For more inspiration, explore our guides on How to Make Homemade Bubbles, How to Make DIY Bubble Wands with Beads, and How to Make Geometric Bubbles. Let your imagination soar!
Unleash Creativity: A Guide to Bubble Printing for Budding Artists
Bubble printing is a delightfully simple art technique that transforms soapy bubbles into unique and captivating artwork. It’s an accessible activity for children of all ages, fostering creativity and providing a mesmerizing visual experience. Beyond being a fun pastime, bubble printing encourages experimentation with color, texture, and pattern – all while being incredibly easy to set up. This guide will walk you through everything you need to know to create stunning bubble prints with your little ones.
The Science Behind the Bubbles & the Art
At its core, bubble printing relies on the principles of surface tension and color transfer. Soap bubbles are thin films of soapy water, and when pigment (like paint) is introduced to the bubble solution, it’s carried along the surface of the bubble. When the bubble lands on paper, the colored film transfers, creating an unpredictable yet beautiful pattern.
This process isn’t just about making pretty pictures; it’s a subtle introduction to scientific concepts. Children can observe how different types of soap affect bubble formation, how the concentration of paint influences the color intensity, and how the surface of the paper impacts the final print. It’s learning disguised as play!
Gathering Your Supplies: A Minimalist Approach
The beauty of bubble printing lies in its simplicity. You won’t need a vast array of expensive art supplies. Here’s what you’ll need to get started:
Bubble Solution: Store-bought bubble solution works perfectly, but you can also make your own (recipes abound online!). Experiment with different formulas to see how they affect bubble size and longevity.
Paint: Liquid watercolors are ideal for vibrant colors and easy mixing. Tempera paint or even diluted acrylics can also be used, but ensure they’re not too thick, as this can hinder bubble formation.
Shallow Dishes: Several shallow dishes or containers are needed to hold the bubble solution and paint mixtures.
Straws or Bubble Wands: Straws (cut at an angle) or commercially available bubble wands are used to create the bubbles.
Paper: Cardstock or watercolor paper works best, as they can withstand the moisture from the bubble solution. Regular printer paper may become soggy.
Protective Covering: A tablecloth or newspaper to protect your work surface.
Step-by-Step Guide to Bubble Printing Magic
- Prepare the Paint Mixtures: In each shallow dish, mix a small amount of paint with bubble solution. The ratio should be roughly 1 part paint to 3-4 parts bubble solution. Adjust as needed to achieve a consistency that easily forms bubbles.
- Create the Bubbles: Dip a straw or bubble wand into one of the paint mixtures. Gently blow (or wave the wand) to create bubbles. Aim for a variety of sizes – larger bubbles tend to create broader patterns, while smaller bubbles result in more intricate designs.
- Print the Bubbles: Carefully bring the bubble-covered straw or wand into contact with the paper. Gently press down to transfer the colored film. Experiment with different angles and pressures to achieve various effects.
- Repeat and Layer: Continue creating bubbles and printing them onto the paper. You can layer colors and patterns to create more complex and visually interesting artwork.
- Let it Dry: Allow the artwork to dry completely. The drying time will depend on the type of paint used and the amount of moisture on the paper.
Beyond the Basics: Expanding Your Bubble Printing Horizons
Once you’ve mastered the basic technique, there are countless ways to expand your bubble printing creativity.
Glitter & Shimmer: Add a pinch of glitter to the paint mixtures for a sparkling effect.
Different Surfaces: Experiment with printing on different surfaces, such as fabric, wood, or even glass.
Bubble Snakes: Create bubble snakes using plastic bottles and fabric to produce long, flowing bubble patterns. For more ideas, explore how to make bubble snakes for unique prints.
Color Blending: Blend different paint colors in the bubble solution to create unique shades and gradients.
Explore Different Tools: Try using different tools to create bubbles, such as slotted spoons or even pipe cleaners.
Cleaning Up & Safety Considerations
Bubble printing is generally a safe activity, but it’s important to take a few precautions.
Supervision: Always supervise young children during the activity.
Non-Toxic Materials: Use non-toxic paints and bubble solutions.
Avoid Ingestion: Discourage children from ingesting the bubble solution or paint.
Protect Surfaces: Cover your work surface to prevent staining.
Easy Cleanup: Clean up spills immediately with a damp cloth.
Bubble printing is more than just an art project; it’s an opportunity to foster creativity, explore scientific concepts, and create lasting memories with your children. So gather your supplies, unleash your imagination, and let the bubble printing magic begin! If you’re looking for more fun art projects, check out our guide on homemade super bubbles for even more bubbly fun. And don’t forget to explore other creative techniques like bubble prints for kids to expand your artistic repertoire.