Hopping into Creativity: A Fun Scraper Art Project for Easter Bunnies
Table of Contents
- Hopping into Creativity: A Fun Scraper Art Project for Easter Bunnies
- Getting Started: Materials You’ll Need
- Let’s Create: Step-by-Step Instructions
- Unleashing Creativity with Scrape Painting
- Materials You’ll Need
- Step-by-Step Guide to Bunny Creation
- Step 1: Laying Down the Paint
- Step 2: The Magic of the Scrape
- Step 3: Bringing Your Bunny to Life
- Elevate Your Bunny Art: Fun Extras
- The Joy of Imperfection
- More Easter Art Activities for Kids
- Why Bunny Painting is Perfect for Easter
- Gathering Your Supplies
- Step-by-Step Bunny Painting Guide
- Step 1: Sketching the Bunny Outline
- Step 2: Applying the Base Coat
- Step 3: Adding Details and Texture
- Step 4: Personalizing Your Bunny
- Beyond the Canvas: Expanding the Fun
- Displaying Your Masterpieces
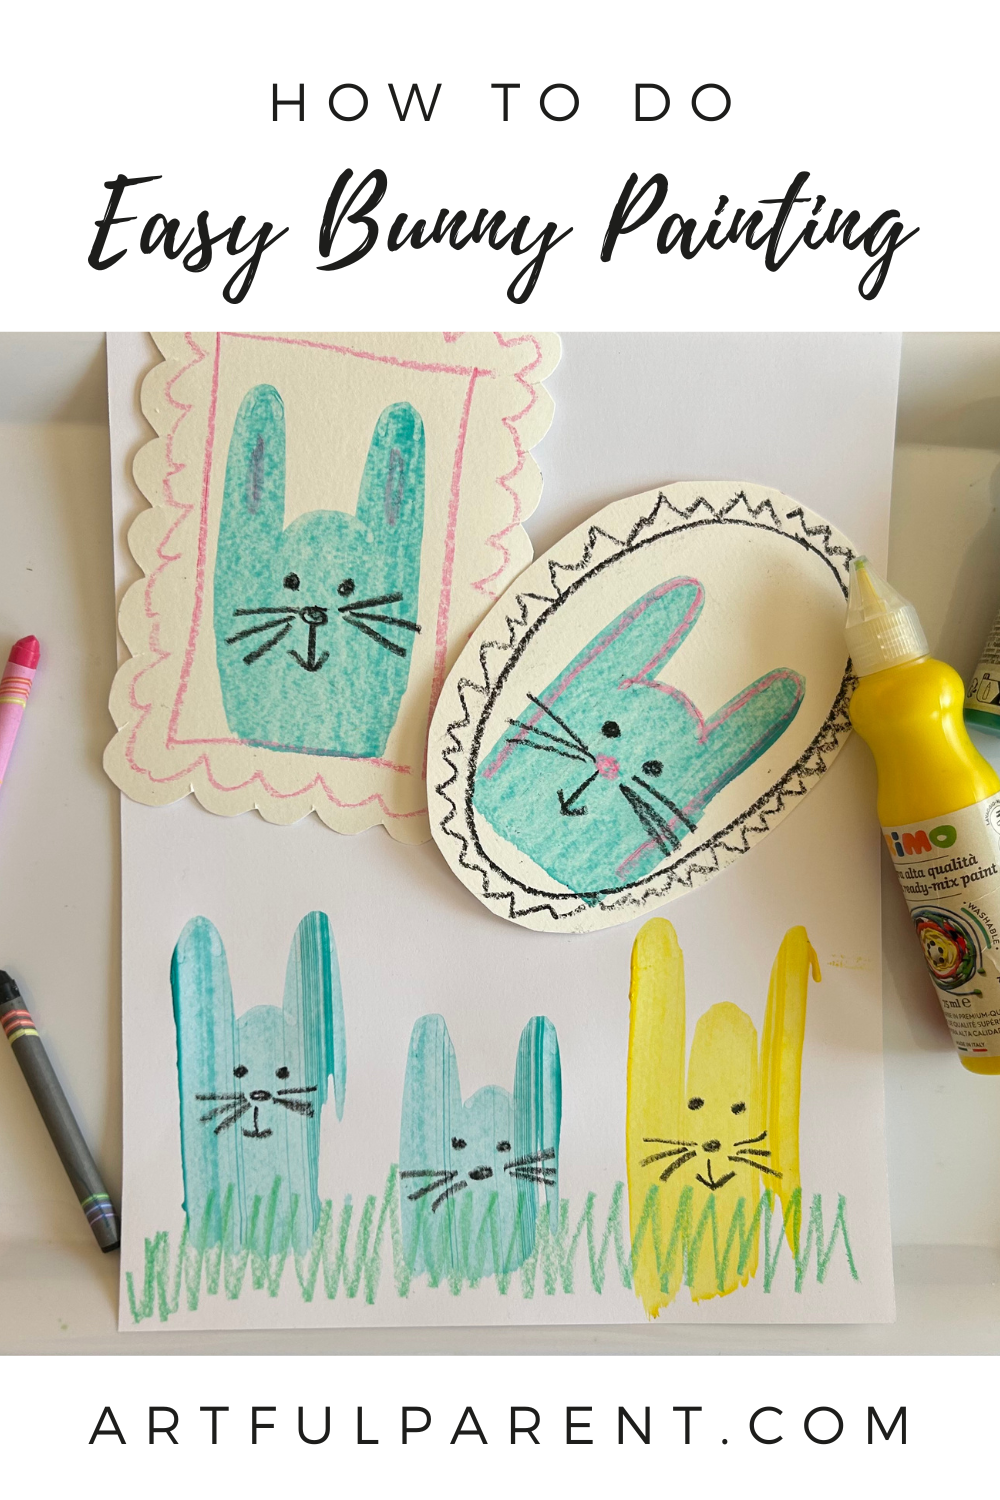
Looking for a fresh and engaging art activity that’s perfect for Easter or any time of year? This unique scraper art project allows you to create adorable bunny paintings with minimal effort and maximum fun! It’s a fantastic process art experience, resulting in colorful and one-of-a-kind creations. We were immediately captivated by the possibilities of scraper painting and, after experimenting with spooky Halloween designs, knew a sweet bunny version was next!
This project is wonderfully accessible – no artistic expertise is needed! Simply squeeze, scrape, and embellish to bring your bunny to life. It’s a brilliant way to encourage creativity and self-expression in children and adults alike. If you’re looking for more Easter-themed crafts, be sure to check out our guide to creating vibrant Easter egg designs!
Getting Started: Materials You’ll Need
Here’s what you’ll need to create your adorable bunny scraper art:
Thick Paper: Cardstock or watercolor paper works best to prevent paint bleed-through.
Squeeze Bottles of Paint: Acrylic or tempera paint in a variety of colors will bring your bunnies to life.
Scraper Tool: An old gift card, a piece of sturdy cardboard, or a plastic spatula will do the trick.
Crayons or Markers: For adding facial features and other delightful details.
* Protective Covering: Paper, a placemat, or a tray to protect your work surface.
Let’s Create: Step-by-Step Instructions
Ready to hop into the fun? Here’s how to create your bunny masterpiece:
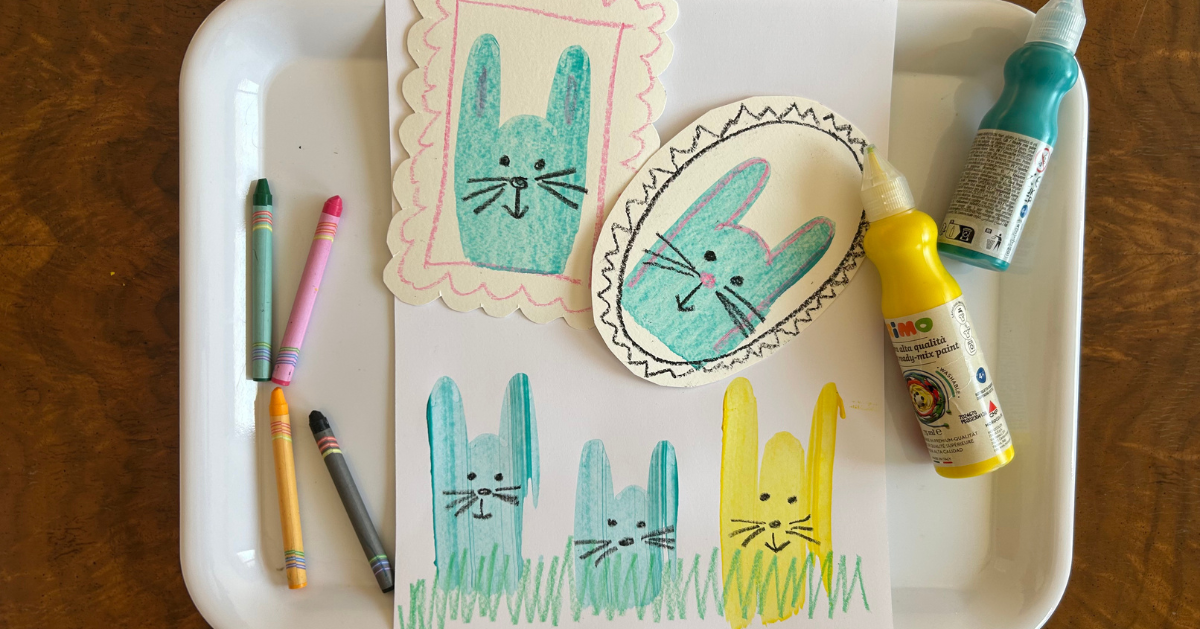
- Prepare Your Workspace: Cover your work surface with paper, a placemat, or a tray to contain any potential mess.
- Squeeze the Paint: Place your paper vertically. Near the top, squeeze three small, semi-circular lines of paint: two for the ears and one for the bunny’s head. Keep them close together to form a cohesive shape. Experiment with different color combinations for a unique look!
- Scrape the Magic: Holding your scraper tool at a slight angle, gently scrape downwards across the paint lines. This will spread the paint and create a beautiful, textured effect. Vary the pressure and angle of your scraper to achieve different results.
- Add Details: Once the paint is dry, use crayons or markers to add facial features, such as eyes, a nose, and a mouth. You can also add other details, like whiskers, a fluffy tail, or even a little bow tie!
- Get Creative: Don’t be afraid to experiment with different colors, shapes, and patterns. You can create a whole family of bunnies, each with its own unique personality.
This project is a wonderful way to explore color mixing and texture. It’s also a fantastic opportunity to encourage children to express their creativity and imagination. For more inspiration, explore different process art techniques and discover the joy of creating art without a specific outcome in mind. If you’re looking for more ways to engage your child’s creativity, consider exploring the benefits of art therapy!

Adorable Bunny Scrape Paintings: A Springtime Art Adventure
Create charming bunny artwork with this delightfully simple scrape painting technique! This project is perfect for all ages and skill levels, offering a unique and surprisingly artistic outcome. Forget precise brushstrokes – we’re embracing happy accidents and letting the paint create the magic.
Unleashing Creativity with Scrape Painting
Scrape painting is an incredibly freeing art form. It’s less about control and more about exploration, making it ideal for fostering creativity in children and adults alike. The unpredictable nature of the technique ensures that every bunny created will be one-of-a-kind, celebrating individuality and artistic expression. Looking for more springtime fun? Check out our guide to spring crafts for even more inspiration!
Materials You’ll Need
Heavyweight paper or cardstock
Tempera or acrylic paint (various spring colors work beautifully)
A scraper tool (a plastic card, old credit card, or even a ruler works well)
Crayons or markers for adding facial features
Step-by-Step Guide to Bunny Creation
Step 1: Laying Down the Paint
Begin by applying generous blobs of paint onto your paper. Don’t worry about neatness – the more varied the paint distribution, the more interesting the texture will be. Consider using a palette of pastel shades like pink, lavender, and baby blue for a classic springtime look, or experiment with bolder hues for a more modern aesthetic.
!
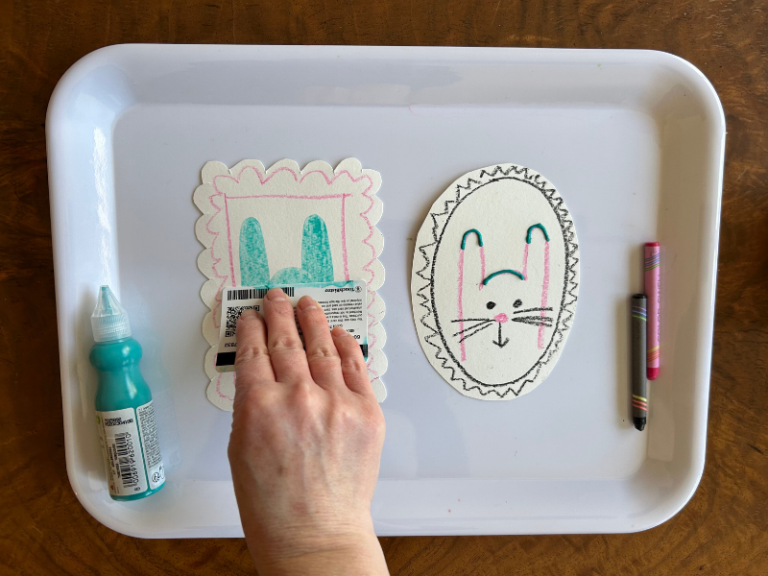
Step 2: The Magic of the Scrape
Once the paint is applied, it’s time to grab your scraper tool. Gently drag the scraper downwards through the paint blobs. As you pull, the paint will spread and create a soft, textured shape – the foundation of your bunny’s body. Experiment with different pressures and angles to achieve unique forms and textures. Don’t be afraid to layer colors and create interesting patterns!
!
Step 3: Bringing Your Bunny to Life
Allow the paint to dry completely. Once dry, use crayons or markers to add the finishing touches – eyes, a tiny nose, a sweet mouth, and perhaps some whiskers. Let your imagination run wild and create a bunny with personality! For a truly unique touch, consider adding details like patterned fur or a colorful bow tie.
!
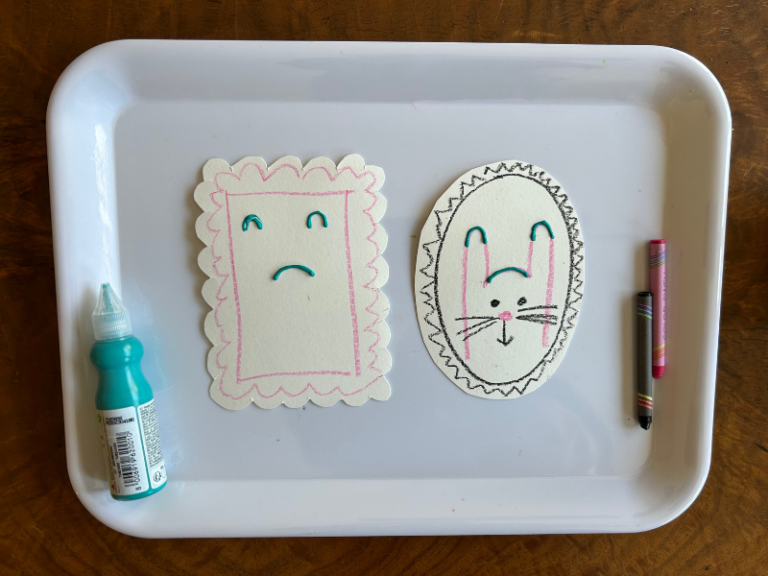
Elevate Your Bunny Art: Fun Extras
Framed Portraits: Cut and decorate your paper into fun frames to showcase your bunny masterpieces.
Color Exploration: Don’t limit yourself to traditional bunny colors! Experiment with vibrant shades and unexpected combinations.
Sparkle and Shine: Add a touch of magic with glitter paint or a sprinkle of fine glitter while the paint is still wet.
Bunny Families: Create a whole bunny family by varying the amount of paint and scrape techniques.
Easter Cards: Turn your artwork into heartfelt Easter cards by folding your painted paper and writing a personal message inside. Looking for more Easter fun? Explore our collection of Easter crafts for all ages!
The Joy of Imperfection
The beauty of this scrape painting technique lies in its unpredictability. No two bunnies will ever be exactly the same, and that’s what makes each creation so special. Embrace the happy accidents and celebrate the unique character of your artwork. This is a wonderful activity for kids and adults to enjoy together this Spring. If you give it a try, don’t forget to share your photos on Instagram and tag us @thetrendytype!
More Easter Art Activities for Kids
Painting with Peeps Easter Art
Hopping into Creativity: Simple Bunny Painting for Easter Fun
Easter is a time for joy, renewal, and, of course, creative expression! While elaborate decorations and complex crafts have their place, sometimes the most rewarding activities are the simplest. This guide will walk you through an easy bunny painting project perfect for kids of all ages, fostering imagination and creating cherished springtime memories. It’s a fantastic way to introduce young artists to painting techniques and celebrate the Easter season.
Why Bunny Painting is Perfect for Easter
Bunny painting offers a unique blend of artistic exploration and seasonal relevance. Beyond being a symbol of Easter, bunnies represent new life and springtime growth, making them a fitting subject for creative endeavors. This project is particularly appealing because it requires minimal materials and can be adapted to suit various skill levels. Plus, the finished artwork can be proudly displayed as Easter decorations or gifted to loved ones. According to a recent survey by the National Retail Federation, over 80% of families participate in Easter-related crafts, highlighting the enduring popularity of these activities.
Gathering Your Supplies
Before you begin, gather the following materials:
Paper: Thick watercolor paper or cardstock is ideal, but regular paper will work in a pinch.
Paints: Tempera, acrylic, or watercolor paints are all suitable. Consider a variety of colors to encourage creativity.
Paintbrushes: A selection of brush sizes will allow for different painting techniques.
Pencils: For sketching the bunny outline.
Erasers: To correct any mistakes.
Water Container: For rinsing brushes.
Paper Towels: For blotting and cleaning.
Optional: Glitter, stickers, or other embellishments for added flair.
Step-by-Step Bunny Painting Guide
Step 1: Sketching the Bunny Outline
Begin by lightly sketching a simple bunny shape onto your paper. Don’t worry about perfection; a whimsical, cartoon-like bunny is perfectly acceptable. Focus on basic shapes – a rounded head, long ears, and a fluffy body. Encourage children to experiment with different poses and expressions. If your child is struggling with the outline, provide a pre-drawn template as a guide.
Step 2: Applying the Base Coat
Once the outline is complete, it’s time to apply the base coat of paint. Choose a color for the bunny’s fur – white, pastel pink, or light blue are popular choices. Encourage children to paint the entire bunny shape, covering the pencil lines. This step may require multiple coats to achieve full coverage.
Step 3: Adding Details and Texture
Now comes the fun part – adding details and texture! Use a smaller brush to paint the bunny’s eyes, nose, and mouth. Encourage children to experiment with different expressions – happy, sad, or mischievous. To create a fluffy texture, use short, quick brushstrokes to add highlights and shadows. Consider using a sponge or cotton ball to dab paint onto the bunny’s fur, creating a unique textured effect.
Step 4: Personalizing Your Bunny
Let your child’s imagination run wild! Encourage them to personalize their bunny with unique details. They can add patterns to the fur, paint a colorful bow tie, or even give the bunny a tiny carrot to hold. Glitter, stickers, and other embellishments can also be used to add extra flair. For inspiration, explore different Easter craft ideas for kids on our website: https://thetrendytype.com/8-fun-easter-arts-crafts-ideas-for-kids-on-instagram.
Beyond the Canvas: Expanding the Fun
This bunny painting project can be easily extended into other creative activities. Consider creating a series of bunny paintings, each with a different expression or pose. You can also use the painted bunnies as decorations for DIY mini Easter baskets (find instructions here: https://thetrendytype.com/diy-mini-easter-baskets-from-a-paper-plate). Or, encourage children to write a story about their bunny, bringing their creation to life through words.
Displaying Your Masterpieces
Once the paintings are dry, proudly display them for all to see! Hang them on the refrigerator, create a gallery wall, or use them as decorations for your Easter table. These handmade creations will add a personal touch to your Easter celebrations and create lasting memories for years to come. Don’t forget to check out our guide on how to paint paper Easter eggs for more festive decorating ideas: https://thetrendytype.com/easter-egg-art-bunting.