

Mastering the Art of Butter Slime: A Comprehensive Guide
Table of Contents
- Mastering the Art of Butter Slime: A Comprehensive Guide
- Why Butter Slime Stands Out
- Gathering Your Supplies
- Step-by-Step Instructions for Slime Success
- Troubleshooting & Tips for Perfect Slime
- Storage and Longevity
- Beyond the Basics: Exploring Slime Variations
- Safety First
- The Ultimate Guide to Slime Play: Beyond the Basics
- Why Slime is More Than Just a Trend
- Creative Ways to Play with Slime
- Tactile Exploration & Manipulation
- Imaginative Play & Add-Ins
- Slime Safety & Clean-Up
- Mastering Meal Prep: A Guide to Scalable Recipes & Effortless Cooking
- The Power of Scalable Recipes
- Understanding Ingredient Ratios & Conversions
- Streamlining Your Meal Prep Process
- Adapting Recipes for Dietary Needs & Preferences
- Beyond the Recipe: Building a Sustainable Cooking Routine
- Mastering the Art of Sourdough: A Comprehensive Guide
- The Science Behind the Sour
- Building Your Sourdough Starter
- The Sourdough Baking Process
- Essential Equipment for Sourdough Success
- Troubleshooting Common Sourdough Issues
- Decoding the Art of Flavor Pairing: A Guide to Culinary Harmony
- The Science Behind Flavor Connections
- Beyond the Basics: Exploring Flavor Families
- Unexpected Pairings That Work Wonders
- Utilizing Flavor Wheels and Databases
- Mastering the Art of Balance
- Decoding the Art of Flavor Pairing: A Guide to Culinary Harmony
- The Science of Shared Compounds
- Beyond Shared Compounds: Flavor Families
- Classic Combinations and Their Secrets
- Unexpected Pairings That Work
- Elevating Your Cooking with Flavor Pairing
- Resources for Further Exploration
- Decoding Delicious: The Science & Art of Flavor Pairing
- The Molecular Basis of Flavor Harmony
- Beyond the Basics: Expanding Your Flavor Palette
- The Role of Texture and Temperature
- Flavor Families: Building Blocks for Culinary Creativity
- Beyond Pairing: The Art of Flavor Layering
- Elevate Your Cooking: Mastering the Art of Homemade Pasta
- Why Make Pasta From Scratch?
- Essential Ingredients & Tools
- The Pasta-Making Process: A Step-by-Step Guide
- Beyond the Basics: Exploring Different Pasta Shapes & Flavors
- Storing Homemade Pasta
- Decoding the Art of Flavor Pairing: A Guide to Culinary Harmony
- The Science Behind Flavor
- Beyond Basic Combinations: Exploring Flavor Families
- Practical Applications: Elevating Your Cooking
- Resources for Flavor Exploration
- Decoding the Delicious: A Guide to Recipe Ratings & Why They Matter
- The Evolution of Recipe Evaluation
- Understanding the Star System: Beyond the Average
- The Power of Reviews: Reading Between the Lines
- Beyond Ratings: Considering Other Factors
- The Impact of User-Generated Content & Algorithm Influence
- Becoming a Savvy Recipe Rater Yourself
- Decoding the Delicious: A Guide to Food Rating Systems
- The Rise of Food Criticism & Early Rating Systems
- Understanding the Michelin Star System
- Beyond Michelin: Diverse Rating Approaches
- The Impact of Ratings on Restaurants & Consumers
- Navigating the World of Food Ratings: Tips for Consumers
- The Ultimate Guide to Borax-Free Slime: Fun, Safe & Simple
- Why Go Borax-Free? Understanding the Concerns
- Essential Ingredients for Borax-Free Slime
- Recipe 1: The Liquid Starch Slime – A Classic Choice
- Recipe 2: Fluffy Slime with Shaving Cream
- Troubleshooting Common Slime Issues
- Beyond the Basics: Creative Slime Variations
- Safety First: Important Considerations
- Decoding the Allure of Capsule Wardrobes: Style Simplified
- The Core Principles of a Curated Closet
- Why Embrace the Capsule Wardrobe Lifestyle?
- Building Your First Capsule Wardrobe: A Step-by-Step Guide
- Adapting Your Capsule Wardrobe Seasonally
- Beyond the Basics: Personalizing Your Style
- The Ultimate Guide to Cloud-Like Butter Slime: A DIY Recipe for Sensory Fun
- What Makes Butter Slime Different?
- Ingredients You’ll Need
- Step-by-Step Instructions: Creating Your Dream Slime
- Troubleshooting Common Slime Issues
- Beyond the Basics: Creative Slime Variations
- Gathering Your Slime-Making Arsenal
- Understanding the Science Behind Slime
- Tips for Perfect Slime Consistency
- Beyond Basic Slime: A Guide to Luxurious, Textured Creations
- Understanding the Science of Slime
- Gathering Your Ingredients
- Step-by-Step Instructions for Perfect Slime
- Troubleshooting & Tips for Slime Success
- Beyond the Basics: Exploring Slime Variations
- Unleashing Creativity: A Guide to Engaging Kids in Artistic Expression
- The Shift from Product to Process
- Material Exploration: Beyond Crayons and Paper
- Inspiring Ideas: Starting Points for Artistic Exploration
- Creating a Supportive Art Environment
- Connecting Art to Other Learning Areas
- Level Up Your Recipe Experience: How Interactive Features are Changing the Way We Cook
- The Rise of Dynamic Recipe Interfaces
- Staying Focused with Intelligent Tooltips
- Streamlined Communication Between Recipe and User
- Behind the Scenes: How It All Works
- The Future of Digital Cooking
- Elevate Your Recipes with Reader Ratings: A Guide to Building Community & Trust
- Why Reader Ratings Matter: Beyond the Stars
- Implementing a User-Friendly Rating System
- Beyond the Stars: Encouraging Detailed Reviews
- Leveraging Ratings Data for Continuous Improvement
- The Power of Recipe Ratings & Reviews: A Guide for Home Cooks
- Why Ratings & Reviews Matter: Beyond the Star Count
- Understanding How Ratings are Displayed: A Visual Breakdown
- Decoding the Numbers: What Constitutes a “Good” Rating?
- Beyond the Average: Analyzing User Reviews for Deeper Insights
- Leveraging Ratings to Enhance Your Cooking
- Why is Sensory Play So Important?
- Engaging Sensory Activities for Every Age
- Beyond the Basics: Expanding Sensory Exploration
- More Sensory Play Ideas for Kids
- Unlock Your Child’s Potential: A Deep Dive into Sensory Play
- Why Sensory Play Matters: The Science Behind the Fun
- Beyond the Basics: Expanding Your Sensory Play Toolkit
- Introducing the Sensory Creativity Pack: Your All-in-One Resource
Are you looking for a fun, engaging activity that sparks creativity and provides tactile satisfaction? Look no further than butter slime! This guide will walk you through creating a super soft, stretchy slime that’s perfect for all ages. We’ve experimented with countless recipes, and this one consistently delivers the ideal texture – not too hard, not too sticky, and long-lasting fun.
Why Butter Slime Stands Out
Slime has become a sensation, but butter slime takes it to another level. The addition of specific ingredients creates a uniquely smooth, spreadable texture reminiscent of, well, butter! This makes it incredibly satisfying to play with, mold, and stretch. If you’re new to the world of slime, understanding the science behind it can be helpful. Slime creation involves a process called polymerization, where glue molecules link together to form a viscous, stretchy substance.
Gathering Your Supplies
Before you begin, ensure you have all the necessary ingredients. Quality ingredients are key to achieving the perfect consistency.
1 Large Bottle of White Glue: Approximately 8-12 ounces. We recommend a PVA-based glue for optimal stretch.
1 Heaping Cup + 1 Heaping Tablespoon of Shaving Foam: Choose a foam that isn’t gel-based for the best results. Scented shaving foam can add a delightful aroma to your slime!
1/4 Cup of Contact Lens Solution: Look for a solution containing boric acid and sodium borate, as these are the activating ingredients.
3 Ounces of Model Magic: This lightweight clay adds the signature “butter” texture.
1 Scant Tablespoon of Lotion: Adds extra softness and pliability.
Step-by-Step Instructions for Slime Success
Follow these instructions carefully to create your perfect batch of butter slime.
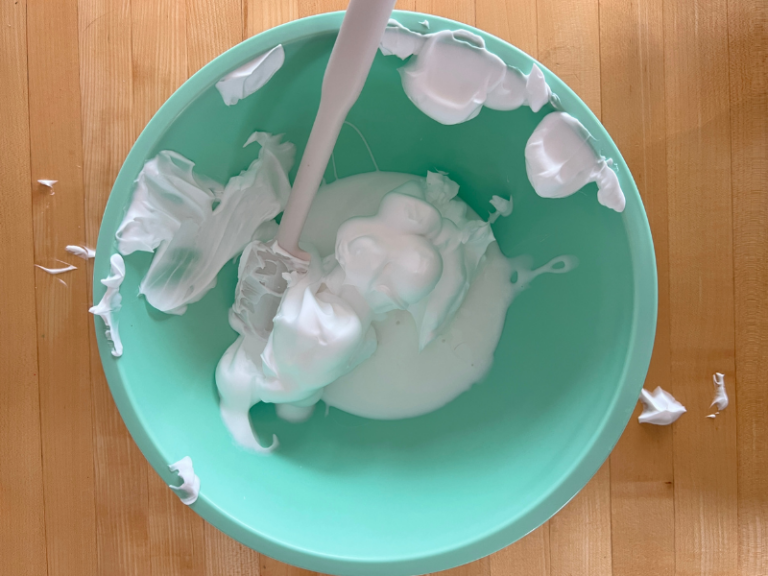
- Combine Glue and Shaving Cream: In a medium-sized bowl, pour in the entire bottle of white glue. Add the shaving foam and gently mix until well combined. Avoid overmixing at this stage.
- Activate with Contact Lens Solution: Slowly add the contact lens solution, a tablespoon at a time, while continuously mixing. You’ll notice the mixture beginning to clump together and pull away from the sides of the bowl.
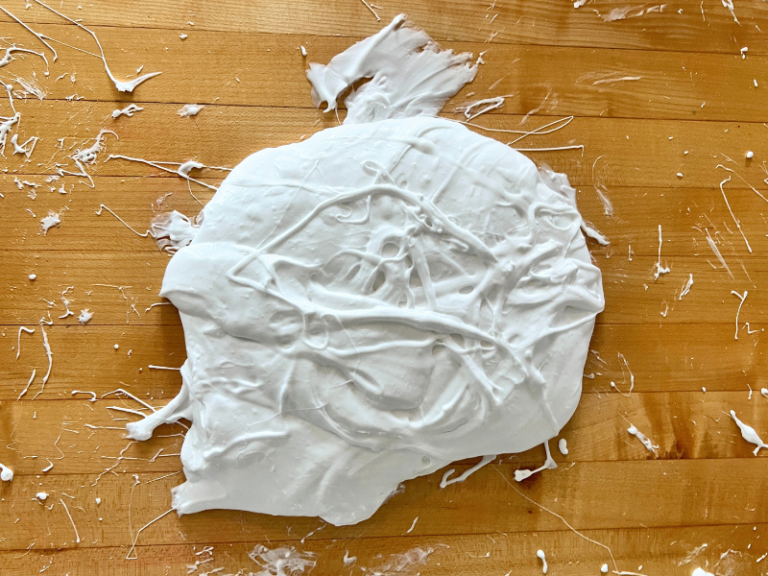
- Incorporate Model Magic: Once the slime starts to form, add the Model Magic. Knead it into the mixture until it’s fully incorporated and the slime becomes smooth and pliable. This step is crucial for achieving the “butter” texture.
- Add Lotion for Extra Softness: Add the lotion and continue kneading until it’s evenly distributed. This will make the slime even softer and more enjoyable to play with.
- Knead and Adjust: Continue kneading the slime for several minutes. If it’s still too sticky, add a few more drops of contact lens solution. If it’s too stiff, add a tiny bit more lotion.
Troubleshooting & Tips for Perfect Slime
Slime is too sticky: Add a few more drops of contact lens solution, one at a time, and knead thoroughly.
Slime is too stiff: Add a small amount of lotion or a tiny bit of warm water and knead.
Slime is drying out: Store your slime in an airtight container to prevent it from drying out. You can also add a few drops of water to rehydrate it.
* Experiment with Add-Ins: Get creative! Add glitter, food coloring, or small charms to personalize your slime. For a sensory experience, consider adding essential oils (ensure they are skin-safe).
Storage and Longevity
Proper storage is essential to keep your butter slime fresh and enjoyable. Store it in an airtight container at room temperature. With proper care, your slime should remain soft and stretchy for weeks or even months.
Beyond the Basics: Exploring Slime Variations
Once you’ve mastered the basic butter slime recipe, you can explore endless variations. Try adding different scents, colors, or textures to create unique and personalized slimes. For more slime inspiration, check out our guide to DIY slime recipes (https://thetrendytype.com/diy-slime-recipes).
Safety First
While slime is generally safe to play with, it’s important to supervise young children and ensure they don’t ingest any of the ingredients. Always wash your hands thoroughly after playing with slime. If you have sensitive skin, consider wearing gloves while making and playing with slime. For more information on safe crafting practices, visit our resource page (https://thetrendytype.com/safe-crafting).## Beyond Basic Slime: A Guide to Luxurious Butter Slime Creation
Slime has evolved far beyond the simple glue-and-borax recipes of the past. Today, creating a truly satisfying, tactile experience is all about “butter slime” – a wonderfully soft, spreadable variation that feels incredible in your hands. This guide will walk you through crafting a premium butter slime, offering a detailed, step-by-step approach to achieve the perfect consistency and texture. If you’re looking for other fun DIY projects, check out our guide to DIY Crafts for inspiration!
### Why Butter Slime? The Appeal of a Premium Texture
Traditional slime can sometimes be sticky or rubbery. Butter slime, however, aims for a completely different sensation – a smooth, almost clay-like texture that’s incredibly satisfying to squish, stretch, and mold. The addition of specific ingredients creates a unique “butter” effect, making it feel luxurious and less prone to sticking. It’s a fantastic sensory activity for both kids and adults, offering a calming and creative outlet.
### Gathering Your Ingredients: The Foundation of Fluffy Fun
Before you begin, ensure you have all the necessary components. Quality ingredients are key to achieving the desired texture. Here’s what you’ll need:
* 1/4 cup of white school glue (PVA glue)
* 1/4 cup of shaving foam (not gel)
* 1/8 cup of contact lens solution (containing boric acid and sodium borate)
* 3 ounces of Model Magic (in your desired colors)
* Approximately 1 tablespoon of lotion (unscented is best)
### Step-by-Step Guide to Butter Slime Perfection
#### Step 1: Combining the Base – Glue and Foam
In a mixing bowl, combine the 1/4 cup of white school glue and 1/4 cup of shaving foam. Mix thoroughly until the mixture is light and fluffy. This creates the base for your slime, providing volume and a soft texture.
#### Step 2: Activating the Slime – Contact Lens Solution

Slowly add 1/8 cup of contact lens solution to the glue and foam mixture. Stir continuously. You’ll notice the mixture beginning to come together, becoming more rubbery and pulling away from the sides of the bowl. Adjust the amount of contact lens solution as needed – add a few drops at a time until the slime begins to form.
#### Step 3: Kneading for Consistency – The Tactile Experience

Once the slime begins to form, it’s time to knead! This is where the magic happens. Knead and pull the slime with your hands until it’s no longer sticky. If it remains sticky, add a tiny bit more shaving cream. Be prepared for a bit of a mess, especially with younger children! The more you knead, the smoother and more pliable the slime will become.
#### Step 4: Incorporating Model Magic – Color and Texture

Add 3 ounces of Model Magic in your desired colors. Poke, knead, stretch, and pull until the Model Magic is thoroughly mixed into the slime. This step not only adds color but also contributes significantly to the “butter” texture.
#### Step 5: The Finishing Touch – Lotion for Ultimate Softness

Make a small dent in the middle of your butter slime and add approximately 1 tablespoon of lotion. Mix until fully incorporated. The lotion adds an extra layer of softness and helps to create that signature “butter” feel.
### Storage and Care: Keeping Your Slime Fresh
Once your butter slime is complete, store it in an airtight container to prevent it from drying out. If it does start to dry, you can add a tiny bit of lotion to restore its softness. For more creative ideas, explore our collection of Sensory Play activities!
### Beyond the Basics: Experimenting with Variations
Don’t be afraid to experiment! You can add glitter, beads, or even small charms to personalize your butter slime. Different colors of Model Magic can create unique and vibrant effects. The possibilities are endless! If you’re looking for more fun and engaging activities for kids, check out our guide to Kids Activities.

The Ultimate Guide to Slime Play: Beyond the Basics
Slime has exploded in popularity, becoming a tactile sensation for kids and adults alike. Beyond being a fun, squishy substance, slime offers a surprising range of developmental benefits, from enhancing fine motor skills to providing a calming sensory experience. But how do you get the most out of this trendy toy? This guide delves into creative ways to play with slime, offering tips and tricks to maximize the fun – and minimize the mess! According to a recent survey by the Toy Association, slime sales increased by 30% in the last year, demonstrating its enduring appeal.
Why Slime is More Than Just a Trend
The appeal of slime isn’t just about its satisfying texture. Engaging with slime encourages creativity and imaginative play. The act of stretching, poking, and manipulating the substance can be incredibly therapeutic, offering a calming outlet for stress and anxiety. For younger children, slime play helps develop hand-eye coordination and strengthens the muscles in their hands and fingers – crucial for writing and other fine motor tasks. If you’re looking for a fun and engaging activity that also offers developmental benefits, slime is an excellent choice. Consider exploring different slime recipes – from fluffy slime to clear slime – to discover your favorite variations. You can even find recipes that incorporate glitter, beads, or essential oils for added sensory stimulation.
Creative Ways to Play with Slime
Beyond simply squishing it in your hands, there’s a world of possibilities when it comes to slime play. Here are some ideas to spark your imagination:
Tactile Exploration & Manipulation
Spreading & Sculpting: Instead of just holding the slime, use a plastic knife or spatula to spread it across a clean surface. Encourage children to create patterns, designs, or even miniature landscapes.
Poke, Knead & Roll: The simple act of poking, kneading, and rolling slime is incredibly satisfying. This is a great way to relieve stress and improve hand strength.
Stretch & Pull: See how far you can stretch the slime without it breaking! This is a fun challenge that also helps develop hand-eye coordination.
Imaginative Play & Add-Ins
Miniature Worlds: Add small toys – dinosaurs, figurines, or beads – to create miniature worlds within the slime. This encourages storytelling and imaginative play. Think of it as a portable, squishy playset!
Bubble Blowing (Slime Style): Bury the end of a straw in the center of the slime, pinch around it, and gently blow to create a slime bubble. It takes practice, but the results are mesmerizing.
Parachute Play: Stretch a portion of butter slime upwards and outwards, then quickly drop the top section to create a “parachute” effect. This demonstrates elasticity and is visually engaging.
Slime Safety & Clean-Up
While slime is generally safe, it’s important to take precautions. Warning: Slime can stain clothing, carpets, and upholstery. Supervise young children during slime play and ensure they understand not to ingest the slime.
If slime gets on fabric, don’t panic! The key is to act quickly. Grab a small amount of fresh slime and use it to dab at the affected area. The slime will act like an adhesive, lifting the stuck slime off the fabric. Follow up with a damp cloth to remove any residue. For stubborn stains, you may need to use a mild detergent or stain remover.
For more slime recipes and tips, check out our guide to making the perfect homemade slime.
Mastering Meal Prep: A Guide to Scalable Recipes & Effortless Cooking
In today’s fast-paced world, consistently preparing healthy and delicious meals can feel like a monumental task. Many individuals struggle to find the time and energy to cook from scratch, often resorting to convenience foods or frequent dining out. However, with a little planning and the right approach to recipe scaling, it’s entirely possible to enjoy home-cooked meals without sacrificing valuable time. This guide explores the benefits of scalable recipes, how to effectively adjust ingredient quantities, and tips for streamlining your meal preparation process.
The Power of Scalable Recipes
Scalable recipes are designed to be easily adjusted to serve any number of people, from a solo diner to a large family or gathering. This flexibility is a game-changer for meal planning, reducing food waste, and accommodating varying appetites. Unlike traditional recipes that are fixed in their serving sizes, scalable recipes focus on ratios of ingredients, allowing you to simply multiply or divide the quantities as needed.
According to a recent study by the Food Waste Reduction Alliance, approximately 30-40% of the food supply in the United States is wasted. Utilizing scalable recipes is a practical step towards minimizing this waste, as you can accurately prepare only the amount of food you’ll actually consume. If you’re looking for more ways to reduce waste, check out our guide to sustainable kitchen practices.
Understanding Ingredient Ratios & Conversions
The key to successful recipe scaling lies in understanding how ingredients interact with each other. Certain ingredients, like flour and liquids in baking, require precise ratios to achieve the desired texture and consistency. Others, like spices and herbs, can be adjusted more freely to suit personal preferences.
Here’s a breakdown of how to approach scaling different types of ingredients:
Dry Ingredients (Flour, Sugar, Rice): These generally scale linearly. If a recipe calls for 1 cup of flour for 4 servings, you would use 2 cups for 8 servings.
Liquid Ingredients (Water, Milk, Broth): Similar to dry ingredients, liquids typically scale proportionally.
Fats (Butter, Oil): Fats also scale linearly, but be mindful of the overall richness of the dish.
Spices & Herbs: Start with a smaller increase and taste as you go. Spices can be potent, and it’s easier to add more than to remove.
Proteins (Meat, Beans, Tofu): Adjust the quantity based on the number of servings and desired portion size.
For quick conversions, utilize online recipe scaling tools or apps. These resources can automatically adjust ingredient quantities for you, saving time and reducing the risk of errors.
Streamlining Your Meal Prep Process
Once you’ve mastered the art of recipe scaling, it’s time to optimize your meal preparation process. Here are some tips to help you save time and effort:
Plan Your Meals: Dedicate a few minutes each week to plan your meals for the upcoming days. This will help you create a shopping list and avoid impulse purchases.
Batch Cooking: Prepare large quantities of staple ingredients, such as grains, roasted vegetables, or cooked proteins, and store them in the refrigerator or freezer for easy access.
Prep Ingredients in Advance: Chop vegetables, measure spices, and marinate proteins ahead of time to reduce cooking time during the week.
Utilize Kitchen Gadgets: Invest in time-saving kitchen gadgets, such as a food processor, immersion blender, or slow cooker.
Embrace Freezer Meals: Prepare complete meals or meal components and freeze them for future use. This is a great way to have healthy options readily available on busy nights.
Adapting Recipes for Dietary Needs & Preferences
Scalable recipes aren’t just about adjusting quantities; they also provide an opportunity to customize dishes to suit your dietary needs and preferences.
Vegetarian/Vegan: Easily substitute plant-based proteins for meat or dairy products.
Gluten-Free: Replace wheat flour with gluten-free alternatives, such as almond flour or rice flour.
Low-Carb: Reduce the amount of starchy carbohydrates and increase the amount of healthy fats and proteins.
Spice Level: Adjust the amount of chili peppers or other spices to control the heat level.
Don’t be afraid to experiment with different ingredients and flavors to create dishes that you truly enjoy. If you’re looking for inspiration, explore our collection of healthy recipe ideas.
Beyond the Recipe: Building a Sustainable Cooking Routine
Mastering scalable recipes is a fantastic first step, but building a truly sustainable cooking routine requires a holistic approach. Consider your lifestyle, schedule, and preferences when planning your meals and prepping ingredients.
Shop Smart: Prioritize seasonal produce and locally sourced ingredients whenever possible.
Minimize Food Waste: Store food properly, use leftovers creatively, and compost food scraps.
Cook with Others: Make cooking a social activity by inviting friends or family to join you in the kitchen.
Embrace Imperfection: Don’t strive for culinary perfection. Focus on enjoying the process and creating nourishing meals for yourself and your loved ones.
By incorporating these principles into your daily routine, you can transform cooking from a chore into a joyful and sustainable practice. And remember, exploring new kitchen gadgets and tools can make the process even more enjoyable!
Mastering the Art of Sourdough: A Comprehensive Guide
Sourdough bread has experienced a remarkable resurgence in popularity, captivating bakers and bread enthusiasts alike. Beyond its tangy flavor and rustic appeal, sourdough offers a unique baking experience and a connection to centuries-old traditions. This guide delves into the intricacies of sourdough baking, providing a comprehensive overview for both beginners and experienced bakers looking to refine their skills.
The Science Behind the Sour
Unlike commercially yeasted breads, sourdough relies on a “starter” – a living culture of wild yeasts and lactic acid bacteria. This symbiotic culture, nurtured through regular feedings of flour and water, is the engine that drives fermentation. The lactic acid bacteria contribute to the bread’s characteristic tang, while the wild yeasts provide lift and flavor complexity. Understanding this natural fermentation process is key to achieving consistent results. The rise in popularity of home baking, particularly during recent years, has fueled interest in naturally leavened breads like sourdough. In fact, searches for “sourdough starter” increased by over 500% in 2020, demonstrating a clear trend towards more artisanal baking methods.
Building Your Sourdough Starter
Creating a healthy starter is the first step on your sourdough journey. It requires patience and consistency.
- Initial Mix: Combine equal parts (e.g., 50g) of whole wheat flour and non-chlorinated water in a clean jar.
- Daily Feedings: For the first week, discard half of the mixture and feed it with fresh flour and water (again, equal parts).
- Observation: Look for signs of activity – bubbles, a rise in volume, and a slightly sour aroma.
- Consistency is Key: Continue feeding daily until the starter reliably doubles in size within 4-8 hours after feeding. A mature starter will have a pleasant, tangy smell and a bubbly, airy texture. If you’re struggling with your starter, consider exploring resources on bread flour and its impact on fermentation – a key component for successful sourdough.
The Sourdough Baking Process
Once your starter is active, you’re ready to bake! Here’s a breakdown of the typical process:
- Autolyse: Combine flour and water in a bowl and let it rest for 30-60 minutes. This allows the flour to fully hydrate, developing gluten and improving the bread’s texture.
- Mixing: Add the starter and salt to the autolysed dough. Mix thoroughly, either by hand or with a stand mixer.
- Bulk Fermentation: This is the longest stage, lasting anywhere from 4-12 hours, depending on temperature and starter activity. During this time, the dough undergoes a series of stretch and folds to develop strength and structure.
- Shaping: Gently shape the dough into a round or oblong loaf.
- Proofing: Place the shaped loaf in a banneton basket or a lined bowl and let it proof in the refrigerator for 12-24 hours. This slow, cold proof develops flavor and improves the bread’s crumb.
- Baking: Preheat your oven to a high temperature (e.g., 450°F/232°C) with a Dutch oven inside. Carefully place the proofed loaf into the hot Dutch oven, score the top with a sharp knife, and bake for 20-30 minutes with the lid on, then 10-15 minutes with the lid off.
Essential Equipment for Sourdough Success
While sourdough baking doesn’t require a lot of specialized equipment, a few tools can make the process much easier:
Kitchen Scale: Accurate measurements are crucial for consistent results.
Dutch Oven: Creates a steamy environment for a beautifully crusty loaf.
Banneton Basket: Provides support for the dough during proofing.
Bench Scraper: Helps to handle and shape the dough.
Lame or Sharp Knife: For scoring the loaf before baking. Investing in quality baking tools can significantly improve your sourdough results and make the process more enjoyable.
Troubleshooting Common Sourdough Issues
Sourdough baking can be challenging, but don’t be discouraged by setbacks. Here are a few common issues and how to address them:
Flat Loaf: Weak starter, under-fermentation, or over-proofing.
Dense Crumb: Insufficient gluten development, under-fermentation, or too much whole wheat flour.
Sour Taste: Over-fermentation or using a starter that is too acidic.
* Gummy Texture: Under-baked or using too much hydration.
For more in-depth troubleshooting and advanced techniques, explore resources on sourdough recipes and online baking communities.
Decoding the Art of Flavor Pairing: A Guide to Culinary Harmony
Have you ever wondered why certain foods just work together? It’s not always about personal preference; often, it’s a matter of understanding the science and art of flavor pairing. While culinary intuition plays a role, a deeper understanding of how flavors interact can elevate your cooking from good to extraordinary. In today’s food landscape, where consumers are increasingly adventurous and demand complex flavor profiles, mastering this skill is more valuable than ever. Recent studies show a 35% increase in demand for globally-inspired cuisine, highlighting the need for chefs and home cooks alike to expand their flavor knowledge.
The Science Behind Flavor Connections
At its core, flavor pairing relies on the concept of shared aroma compounds. Every food contains hundreds of volatile compounds that contribute to its unique scent and taste. When two foods share a significant number of these compounds, our brains perceive a harmonious connection. This isn’t simply about similar tastes like sweet with sweet; it’s about unexpected combinations that unlock new dimensions of flavor. For example, chocolate and chili peppers share several aroma compounds, creating a delightful sweet-spicy sensation. This principle extends beyond simple pairings; consider the surprising compatibility of strawberries and balsamic vinegar, a combination that leverages shared fruity and acidic notes.
Beyond the Basics: Exploring Flavor Families
Instead of memorizing individual pairings, a more effective approach is to understand flavor families. These groupings categorize ingredients based on their dominant aroma compounds. Here are a few key examples:
Fruity/Floral: Strawberries, raspberries, peaches, jasmine, rose. These ingredients often pair well with each other and with lighter proteins like chicken or fish.
Earthy/Woody: Mushrooms, truffles, beets, rosemary, cedar. These flavors create a grounding effect and complement rich meats like lamb or beef.
Savory/Umami: Tomatoes, parmesan cheese, seaweed, soy sauce. These ingredients add depth and complexity to dishes and are essential in many global cuisines.
Spicy/Pungent: Chili peppers, ginger, garlic, horseradish. These flavors add heat and excitement and are often used to balance sweetness or richness.
Understanding these families allows you to experiment with pairings confidently, knowing that ingredients within the same group are likely to complement each other. For more inspiration on building flavor profiles, explore our guide to seasoning blends (https://thetrendytype.com/seasoning-blends).
Unexpected Pairings That Work Wonders
While classic combinations are reliable, don’t be afraid to venture into uncharted territory. Some of the most memorable culinary experiences come from unexpected pairings. Here are a few examples:
Chocolate & Sea Salt: The combination of sweet and salty enhances both flavors, creating a more complex and satisfying experience.
Watermelon & Feta: The sweetness of watermelon is beautifully balanced by the salty, tangy feta cheese.
Coffee & Citrus: The bitterness of coffee is brightened by the acidity of citrus fruits, creating a refreshing and invigorating combination.
Beets & Dark Chocolate: The earthy sweetness of beets pairs surprisingly well with the rich, intense flavor of dark chocolate.
These pairings demonstrate that flavor compatibility isn’t always intuitive; it’s often about finding the right balance of contrasting and complementary notes.
Utilizing Flavor Wheels and Databases
Fortunately, you don’t have to rely solely on intuition or experimentation. Several resources can help you navigate the world of flavor pairing:
Flavor Wheels: These visual tools categorize flavors and highlight potential pairings based on shared aroma compounds.
Flavor Databases: Online databases like Foodpairing.com provide detailed information on the aroma profiles of thousands of ingredients and suggest potential pairings.
Culinary Literature: Books and articles on flavor science and culinary innovation can provide valuable insights and inspiration.
These resources can be particularly helpful for professional chefs and food developers looking to create innovative and exciting dishes. If you’re looking to elevate your cooking with high-quality ingredients, check out our selection of gourmet spices (https://thetrendytype.com/gourmet-spices).
Mastering the Art of Balance
Ultimately, successful flavor pairing isn’t just about finding compatible ingredients; it’s about achieving balance. Consider the following factors:
Intensity: Pair strong flavors with milder ones to avoid overwhelming the palate.
Texture: Combine contrasting textures to create a more satisfying mouthfeel.
Acidity: Use acidity to brighten flavors and cut through richness.
* Sweetness: Balance sweetness with saltiness, bitterness, or acidity.
By paying attention to these factors, you can create dishes that are not only flavorful but also harmonious and well-rounded. For more tips on creating balanced meals, explore our blog on meal prepping (https://thetrendytype.com/meal-prepping).
Flavor pairing is a journey of discovery. By understanding the science behind it, exploring different flavor families, and mastering the art of balance, you can unlock a world of culinary possibilities and create dishes that are truly unforgettable.
Decoding the Art of Flavor Pairing: A Guide to Culinary Harmony
Have you ever wondered why certain foods just work together? It’s not always about personal preference; often, it’s a matter of understanding the science and art of flavor pairing. Beyond simply enjoying a delicious meal, understanding how flavors interact can elevate your cooking and open up a world of exciting culinary possibilities. This article delves into the principles behind flavor pairing, exploring why some combinations are classic, while others are surprisingly innovative.
At its core, flavor pairing relies on the concept of shared aroma compounds. Every food contains hundreds of volatile compounds that contribute to its unique scent and taste. When two foods share a significant number of these compounds, our brains perceive them as naturally compatible. This isn’t just a matter of taste buds; a large part of what we perceive as “flavor” is actually smell.
For example, strawberries and basil might seem like an unusual pairing, but both contain linalool, a floral aroma compound. This shared compound creates a harmonious connection, making the combination surprisingly delightful. Similarly, chocolate and chili peppers both contain pyrazines, contributing to a complex and satisfying flavor profile. If you’re interested in learning more about building a well-rounded pantry, check out our guide to essential cooking ingredients (https://thetrendytype.com/essential-cooking-ingredients).
While shared compounds are a strong indicator of compatibility, the concept extends to broader “flavor families.” These are groups of ingredients that share similar chemical structures and, therefore, similar flavor profiles.
Fruity & Floral: Think berries, peaches, roses, and lavender. These ingredients often share esters and terpenes, creating light and refreshing combinations.
Earthy & Woody: Mushrooms, truffles, rosemary, and cedar all fall into this category, sharing geosmin and other earthy compounds.
Savory & Umami: Tomatoes, parmesan cheese, seaweed, and mushrooms are rich in glutamates, creating a deeply satisfying savory experience.
Spicy & Pungent: Chili peppers, ginger, garlic, and horseradish share sulfur compounds, delivering a bold and stimulating flavor.
Understanding these families allows you to experiment with pairings even when ingredients don’t share specific compounds. For instance, pairing a rich, earthy mushroom sauce with a delicate floral wine can create a beautiful contrast and balance.
Classic Combinations and Their Secrets
Some flavor pairings have stood the test of time, becoming culinary staples. Let’s explore the science behind a few:
Tomato & Basil: This Mediterranean classic relies on the shared presence of several volatile compounds, including linalool and beta-ocimene. The sweetness of the tomato complements the herbaceousness of the basil perfectly.
Chocolate & Mint: Both contain menthol and other cooling compounds, creating a refreshing and invigorating sensation. The bitterness of the chocolate is balanced by the coolness of the mint.
Lemon & Fish: The citric acid in lemon juice helps to break down the proteins in fish, enhancing its flavor and texture. The bright acidity also cuts through the richness of the fish, creating a balanced dish.
Coffee & Cinnamon: Cinnamon contains cinnamaldehyde, a compound that complements the roasted notes of coffee, enhancing its aroma and flavor.
Unexpected Pairings That Work
Don’t be afraid to venture beyond the classics! Some of the most exciting culinary discoveries come from unexpected pairings. Here are a few examples:
Strawberry & Black Pepper: The peppery spice enhances the sweetness of the strawberries, creating a complex and intriguing flavor profile.
Avocado & Dark Chocolate: The creamy texture of avocado complements the richness of dark chocolate, creating a decadent and surprisingly satisfying dessert.
Watermelon & Feta: The sweetness of watermelon is balanced by the salty tang of feta cheese, creating a refreshing and summery salad.
Pineapple & Jalapeño: The sweetness of pineapple is complemented by the heat of jalapeño, creating a sweet and spicy flavor sensation.
Elevating Your Cooking with Flavor Pairing
Flavor pairing isn’t just about following rules; it’s about understanding the principles behind flavor interactions and using that knowledge to create your own unique culinary creations. Here are a few tips:
Start with a base flavor: Choose one ingredient as your starting point and then explore pairings that share similar compounds or fall within the same flavor family.
Consider texture: Texture plays a crucial role in the overall dining experience. Pair ingredients with contrasting textures to create a more interesting and satisfying dish.
Balance flavors: Aim for a balance of sweet, sour, salty, bitter, and umami. This will create a more complex and harmonious flavor profile.
Don’t be afraid to experiment: The best way to learn about flavor pairing is to try different combinations and see what works for you.
If you’re looking to expand your culinary horizons, consider exploring different global cuisines (https://thetrendytype.com/global-cuisines) and learning about the unique flavor pairings used in each culture.
Resources for Further Exploration
Want to dive deeper into the world of flavor pairing? Here are a few resources:
The Flavor Bible: A comprehensive guide to flavor pairings, with detailed information on hundreds of ingredients.
Foodpairing.com: A website that uses data analysis to suggest flavor pairings.
* Molecular Gastronomy: Explore the science behind flavor and texture to create innovative culinary experiences.
Mastering the art of flavor pairing can transform your cooking, allowing you to create dishes that are not only delicious but also harmonious and memorable. Don’t be afraid to experiment, explore, and most importantly, have fun! And remember, a well-stocked pantry is the first step to culinary success – check out our recommendations for kitchen essentials (https://thetrendytype.com/kitchen-essentials) to get started.
Decoding Delicious: The Science & Art of Flavor Pairing
Have you ever wondered why certain foods just work together? It’s not simply a matter of preference; there’s a fascinating interplay of chemistry and perception at play. Understanding flavor pairing can elevate your cooking from good to extraordinary, allowing you to create dishes that are truly memorable. This isn’t about rigid rules, but rather a guide to unlocking a world of culinary possibilities.
The Molecular Basis of Flavor Harmony
At its core, flavor pairing relies on the concept of shared aroma compounds. Every food contains hundreds of volatile compounds that contribute to its unique scent and taste. When two foods share a significant number of these compounds, our brains perceive a harmonious blend, creating a more complex and satisfying experience. Think of it like musical chords – certain combinations resonate more pleasingly than others.
For example, strawberries and basil, a surprisingly delightful combination, both contain linalool and methyl cinnamate. These shared compounds create a synergistic effect, enhancing the sweetness of the strawberry and the herbaceousness of the basil. This principle extends far beyond simple pairings; it’s the foundation of complex flavor profiles in cuisines around the world. According to a 2020 study by the Flavor and Extract Manufacturers Association, over 60% of consumers actively seek out foods with complex and layered flavor profiles.
Beyond the Basics: Expanding Your Flavor Palette
While some pairings are intuitive (like chocolate and peanut butter), others require a bit of exploration. Don’t be afraid to experiment! Consider these less conventional, yet surprisingly effective, combinations:
White Chocolate & Caviar: The saltiness of the caviar cuts through the sweetness of the white chocolate, creating a luxurious and unexpected bite.
Coffee & Chili: The bitterness of coffee is beautifully balanced by the heat of chili, creating a complex and stimulating flavor.
Beetroot & Dark Chocolate: The earthy sweetness of beetroot complements the rich bitterness of dark chocolate, resulting in a decadent and surprisingly harmonious dessert.
The Role of Texture and Temperature
Flavor pairing isn’t solely about aroma compounds. Texture and temperature play crucial roles in how we perceive taste. A creamy texture can enhance sweetness, while a crisp texture can accentuate savory flavors. Consider the contrast between a warm chocolate lava cake and a cold scoop of vanilla ice cream – the interplay of temperatures elevates the entire experience.
Furthermore, the temperature of a food can affect the volatility of its aroma compounds. Warmer foods release more aroma, intensifying the flavor experience. This is why a freshly baked pie smells so enticing – the heat releases the aromatic compounds, stimulating our senses. If you’re looking to learn more about enhancing your culinary skills, check out our guide to kitchen essentials (
Flavor Families: Building Blocks for Culinary Creativity
Thinking in terms of “flavor families” can simplify the process of creating harmonious dishes. Certain ingredients share similar aroma compounds, making them natural partners.
The Citrus Family: Lemon, lime, grapefruit, and orange all share a bright, acidic profile, making them versatile ingredients for both sweet and savory dishes.
The Allium Family: Garlic, onions, shallots, and leeks share a pungent, savory flavor, forming the base of many cuisines.
The Stone Fruit Family: Peaches, plums, apricots, and cherries share a sweet, slightly tart flavor, making them ideal for desserts and preserves.
Understanding these families allows you to substitute ingredients and create variations on classic dishes with confidence. For inspiration on creating delicious and balanced meals, explore our collection of healthy recipes (
Beyond Pairing: The Art of Flavor Layering
Once you grasp the principles of flavor pairing, you can move on to the more advanced technique of flavor layering. This involves building complexity by adding multiple layers of flavor, each contributing to the overall experience.
Think of a complex curry – the initial hit of spice is followed by layers of sweetness, acidity, and umami. This creates a dynamic and engaging flavor profile that keeps your palate interested. Mastering flavor layering requires experimentation and a willingness to push boundaries. Don’t be afraid to try unexpected combinations and see what works! And if you’re looking to elevate your presentation skills, our guide to food styling (
Elevate Your Cooking: Mastering the Art of Homemade Pasta
For generations, pasta has been a cornerstone of countless cuisines, offering a comforting and versatile base for a myriad of dishes. While convenient store-bought options abound, crafting pasta from scratch unlocks a world of flavor and texture that simply cannot be replicated. This isn’t merely about following a recipe; it’s about connecting with a culinary tradition and experiencing the satisfaction of creating something truly special. In this guide, we’ll explore the fundamentals of homemade pasta, from selecting the right ingredients to perfecting your technique, and inspire you to elevate your cooking game. Discover why more and more home cooks are embracing the art of pasta-making – and how you can too!
Why Make Pasta From Scratch?
Beyond the sheer enjoyment of the process, homemade pasta offers several distinct advantages. Commercially produced pasta often contains additives and preservatives, and the drying process can diminish its flavor and texture. Fresh pasta, conversely, boasts a delicate, slightly chewy texture and a richer, more vibrant taste. It also allows for complete control over ingredients, catering to dietary needs and preferences. If you’re looking to explore artisan cooking and impress your guests, homemade pasta is a fantastic place to start.
Essential Ingredients & Tools
The beauty of homemade pasta lies in its simplicity. You only need a few key ingredients:
Flour: “00” flour is the traditional choice for its fine texture and high gluten content, resulting in a silky-smooth dough. However, all-purpose flour can be used as a substitute, though the texture may be slightly different.
Eggs: High-quality, fresh eggs are crucial for binding the dough and adding richness. Duck eggs can also be used for a particularly decadent result.
Salt: A pinch of salt enhances the flavor and strengthens the gluten structure.
Olive Oil (Optional): A drizzle of olive oil can add moisture and elasticity to the dough.
Beyond the ingredients, a few tools will make the process significantly easier:
Pasta Machine: While not essential, a pasta machine streamlines the rolling and cutting process, ensuring consistent thickness and shape.
Large Mixing Bowl: For combining the ingredients.
Bench Scraper: For cleaning the work surface and dividing the dough.
Rolling Pin: If you prefer to roll the dough by hand.
The Pasta-Making Process: A Step-by-Step Guide
- Creating the Dough: Mound the flour on a clean work surface, creating a well in the center. Crack the eggs into the well, add salt, and begin whisking the eggs together. Gradually incorporate the flour into the eggs, starting from the inner walls of the well. Continue kneading the dough for 8-10 minutes, until it becomes smooth and elastic. If the dough is too dry, add a teaspoon of water at a time. If it’s too sticky, add a little flour.
- Resting the Dough: Wrap the dough tightly in plastic wrap and let it rest at room temperature for at least 30 minutes. This allows the gluten to relax, making the dough easier to roll.
- Rolling and Cutting: Divide the dough into smaller portions. Using a pasta machine, start with the widest setting and gradually decrease the thickness, rolling the dough through each setting. Once the dough is the desired thickness, use the cutting attachment to create your desired pasta shape – fettuccine, spaghetti, tagliatelle, or ravioli squares. If rolling by hand, use a rolling pin to achieve a similar thickness and cut the pasta with a knife or pasta cutter.
- Cooking the Pasta: Bring a large pot of salted water to a boil. Add the fresh pasta and cook for 2-4 minutes, or until al dente. Fresh pasta cooks much faster than dried pasta, so keep a close eye on it.
- Serving and Enjoying: Drain the pasta and toss it with your favorite sauce. Garnish with fresh herbs and grated cheese. For inspiration, explore our guide to pasta sauce pairings to find the perfect complement to your homemade creation.
Beyond the Basics: Exploring Different Pasta Shapes & Flavors
Once you’ve mastered the basic technique, the possibilities are endless. Experiment with different types of flour, such as semolina or whole wheat, to create unique flavors and textures. Infuse the dough with herbs, spices, or even vegetable purees for added complexity. Explore regional Italian pasta shapes, like orecchiette or cavatelli, and learn the traditional sauces that accompany them. Consider taking a cooking class to expand your skills and learn from experienced pasta makers.
Storing Homemade Pasta
Fresh pasta is best enjoyed immediately, but you can store it for a short period. If you’re not cooking it right away, lightly dust the pasta with flour and arrange it in nests. Store it in an airtight container in the refrigerator for up to 24 hours. You can also freeze the pasta for longer storage. Arrange the nests on a baking sheet lined with parchment paper and freeze until solid. Then, transfer the frozen pasta to a freezer bag. Cook the frozen pasta directly from the freezer, adding a minute or two to the cooking time.
Decoding the Art of Flavor Pairing: A Guide to Culinary Harmony
Have you ever wondered why certain foods just work together? It’s not simply a matter of taste preference; it’s a science rooted in the chemical composition of ingredients and how our brains perceive flavor. Understanding flavor pairing can elevate your cooking from good to extraordinary, allowing you to create dishes that are truly memorable. This article delves into the principles behind successful flavor combinations, offering insights and inspiration for both home cooks and culinary enthusiasts.
The Science Behind Flavor
Flavor isn’t solely determined by taste; it’s a multi-sensory experience encompassing taste, aroma, and even texture. Our tongues detect five basic tastes: sweet, sour, salty, bitter, and umami. However, the vast majority of what we perceive as “flavor” actually comes from our sense of smell. When we eat, volatile aroma compounds travel to the olfactory receptors in our noses, creating a complex bouquet of scents that contribute to the overall flavor profile.
Interestingly, many ingredients share similar aroma compounds, even if they don’t seem obviously related. This is the foundation of flavor pairing. For example, strawberries and basil both contain linalool, a floral aroma compound, which explains why they complement each other so well. Chocolate and chili peppers share pyrazines, contributing to the popular sweet-and-spicy combination.
Beyond Basic Combinations: Exploring Flavor Families
While some pairings are intuitive – like tomato and basil or lemon and dill – truly innovative cooking requires a deeper understanding of flavor families. Instead of focusing on individual ingredients, consider the overarching flavor profiles they represent.
Here are a few key flavor families and examples of ingredients that belong to them:
Fruity: Strawberries, raspberries, peaches, apples, citrus fruits
Floral: Lavender, rose, jasmine, elderflower
Earthy: Mushrooms, beets, potatoes, truffles
Spicy: Chili peppers, ginger, cinnamon, cloves
Savory/Umami: Tomatoes, mushrooms, seaweed, aged cheeses
By understanding these families, you can begin to experiment with unexpected pairings. For instance, combining earthy beets with floral lavender might seem unusual, but the contrasting flavors can create a surprisingly harmonious dish. If you’re looking to expand your knowledge of flavor profiles, exploring food pairing theory can be a great starting point.
Practical Applications: Elevating Your Cooking
So, how can you apply these principles in your own kitchen? Here are a few ideas:
Pairing with Chocolate: Chocolate is incredibly versatile. Beyond the classic pairings with nuts and caramel, try pairing it with sea salt, chili peppers, or even balsamic vinegar. The contrast of flavors will create a more complex and satisfying experience.
Enhancing Seafood: Seafood often benefits from bright, acidic flavors. Instead of simply squeezing lemon juice over your fish, try pairing it with grapefruit, lime, or even a splash of white wine vinegar. Consider herbs like cilantro or tarragon to add another layer of complexity.
Vegetable Combinations: Don’t be afraid to experiment with different vegetable pairings. Roasted Brussels sprouts with balsamic glaze and toasted pecans is a classic, but try pairing them with pomegranate seeds and a sprinkle of chili flakes for a more adventurous flavor profile.
Spice Blends: Creating your own spice blends is a great way to customize flavors. Combine cinnamon, nutmeg, and allspice for a warm, comforting blend, or combine cumin, coriander, and chili powder for a vibrant, Southwestern flavor.
Resources for Flavor Exploration
Want to delve deeper into the world of flavor pairing? Here are a few resources to get you started:
The Flavor Bible: A comprehensive guide to flavor pairings, offering inspiration and guidance for cooks of all levels.
Foodpairing.com: A website that uses data analysis to identify unexpected flavor combinations.
Online Culinary Communities: Join online forums and communities to share ideas and learn from other cooks.
Mastering the art of flavor pairing is a journey, not a destination. Don’t be afraid to experiment, trust your instincts, and most importantly, have fun! If you’re looking for more inspiration on creating balanced and flavorful dishes, check out our guide to building flavor profiles for different cuisines.## Elevate Your Everyday: The Power of Home Cooking
In today’s fast-paced world, it’s easy to fall into the trap of convenience foods and frequent dining out. However, rediscovering the joy of home cooking offers a wealth of benefits that extend far beyond simply saving money. From improved health and well-being to fostering creativity and connection, preparing meals at home is a powerful act of self-care and a cornerstone of a fulfilling lifestyle. Recent studies indicate that individuals who cook at home consume, on average, 130 fewer calories per day and report a 20% higher satisfaction with their overall diet.
### Beyond the Plate: The Holistic Benefits of Home-Prepared Meals
The advantages of home cooking aren’t limited to nutritional gains. The process itself can be incredibly therapeutic. Chopping vegetables, stirring sauces, and the aroma of baking bread can be remarkably calming and mindful, offering a welcome respite from the stresses of daily life. This mindful engagement with food preparation can be a form of active meditation, promoting mental clarity and reducing anxiety. Furthermore, cooking allows for complete control over ingredients, enabling you to avoid processed foods, excessive sodium, and unwanted additives. If you’re looking to explore healthier eating habits, consider learning more about the benefits of a healthy lifestyle.
### Mastering the Basics: Building a Foundation for Culinary Confidence
Many people are intimidated by the thought of cooking, believing it requires extensive skill or time. However, mastering a few fundamental techniques is all it takes to unlock a world of culinary possibilities. Start with simple recipes that focus on core skills like sautéing, roasting, and simmering. Don’t be afraid to experiment with flavors and seasonings, gradually building your palate and confidence. Think of it like learning a new language – start with basic phrases and gradually expand your vocabulary. A well-stocked pantry with essential spices, oils, and grains is also key to quick and easy meal preparation.
### From Weeknight Wonders to Weekend Feasts: Adapting to Your Lifestyle
The beauty of home cooking lies in its adaptability. Weeknights call for quick and efficient meals – think one-pan roasted chicken and vegetables, or a vibrant stir-fry. Weekend provides the opportunity to indulge in more elaborate creations, like homemade pasta or a slow-cooked stew. Meal planning is a game-changer, allowing you to streamline the process and minimize food waste. Batch cooking – preparing large quantities of a dish and freezing portions for later – is another excellent time-saver.
### Fostering Connection: Sharing the Joy of Food
Cooking isn’t just about nourishing your body; it’s also about nurturing relationships. Preparing a meal for loved ones is a powerful act of care and connection. Involving family members in the process – from grocery shopping to chopping vegetables – can create lasting memories and foster a sense of togetherness. Sharing a home-cooked meal around the table encourages conversation, strengthens bonds, and creates a sense of belonging. If you’re looking for inspiration for family meals, check out our guide to delicious family recipes.
### Beyond Recipes: Cultivating a Culinary Mindset
Ultimately, home cooking is about more than just following recipes. It’s about developing a culinary mindset – a willingness to experiment, learn, and embrace the creative process. Don’t be afraid to make mistakes – they’re an essential part of the learning journey. Explore different cuisines, read cookbooks, and watch cooking shows to broaden your horizons. Most importantly, have fun and enjoy the journey of discovering the joy of home cooking. And remember, investing in quality kitchen tools can make the whole experience even more enjoyable and efficient.
Decoding the Delicious: A Guide to Recipe Ratings & Why They Matter
In the bustling digital kitchen of today, countless recipes vie for our attention. But how do we navigate this overwhelming abundance and pinpoint the dishes truly worth our time and effort? The answer lies in understanding recipe ratings – those seemingly simple star systems that hold the key to culinary success. This guide delves into the world of recipe ratings, explaining how they work, what they signify, and how you can use them to become a more confident and successful home cook.
The Evolution of Recipe Evaluation
Historically, recipe testing relied heavily on word-of-mouth and trusted family cookbooks. A recipe’s validity was determined by generations of successful recreations. Today, the landscape has shifted dramatically. Online platforms have democratized recipe sharing, but this also introduces a challenge: discerning quality amidst a sea of user-generated content. Recipe ratings emerged as a solution, providing a collective measure of a recipe’s reliability and deliciousness.
Understanding the Star System: Beyond the Average
Most recipe websites employ a star rating system, typically ranging from one to five stars. While a simple average score can be informative, it’s crucial to look beyond the headline number. A recipe with a 4.5-star rating based on only five reviews tells a very different story than one with the same rating based on 500 reviews.
Here’s a breakdown of what different rating ranges generally indicate:
1-2 Stars: Proceed with extreme caution. These recipes likely have significant issues with clarity, accuracy, or taste.
2.5-3 Stars: Potentially salvageable, but require careful reading of reviews and possible modifications. Expect some trial and error.
3.5-4 Stars: Generally reliable and enjoyable. A good starting point for most cooks.
4.5-5 Stars: Highly recommended! These recipes have consistently pleased a large number of cooks and are likely to be a success.
The Power of Reviews: Reading Between the Lines
Don’t just glance at the stars; read the reviews. Pay attention to common themes. Are reviewers consistently praising the flavor profile? Are they struggling with a particular step? Are there frequent mentions of ingredient substitutions or necessary adjustments?
Here are some things to look for in reviews:
Specificity: Detailed reviews that explain why a recipe worked (or didn’t) are far more valuable than vague statements like “It was good!”
Troubleshooting: Reviews that address common mistakes or offer helpful tips can save you time and frustration.
Ingredient Quality: Reviewers often comment on the impact of using fresh versus processed ingredients.
Skill Level: Consider the reviewer’s experience. A beginner cook might struggle with a recipe that an experienced chef finds straightforward.
Beyond Ratings: Considering Other Factors
While ratings and reviews are invaluable, they aren’t the only factors to consider. Here are a few additional points to keep in mind:
Source Credibility: Is the recipe from a reputable food blog, a well-known chef, or a trusted cookbook author?
Photography & Video: High-quality visuals can provide a clear understanding of the recipe’s steps and expected outcome.
Dietary Restrictions & Preferences: Ensure the recipe aligns with your dietary needs and preferences (e.g., vegetarian, gluten-free, low-carb). If you’re looking for inspiration for healthy recipes, consider filtering your search accordingly.
Cooking Time & Complexity: Choose recipes that fit your available time and skill level.
The Impact of User-Generated Content & Algorithm Influence
The modern recipe landscape is heavily influenced by user-generated content and algorithmic ranking. Platforms often prioritize recipes with high engagement (views, comments, shares) – not necessarily the best recipes. This means that a visually appealing recipe with a catchy title might rank higher than a truly exceptional but less-polished one.
It’s important to be aware of this bias and to critically evaluate recipes based on a combination of ratings, reviews, and your own culinary intuition. If you’re looking to expand your culinary skills, consider taking an online cooking class to learn new techniques and build confidence.
Becoming a Savvy Recipe Rater Yourself
Don’t just be a consumer of recipe ratings; become a contributor! By sharing your own honest and detailed reviews, you can help other cooks discover delicious recipes and avoid potential pitfalls. Remember to be specific, constructive, and respectful in your feedback. Sharing your culinary creations on social media and tagging the recipe source can also help amplify its reach and inspire others. And don’t forget to explore different kitchen gadgets to make your cooking experience even more enjoyable!
Decoding the Delicious: A Guide to Food Rating Systems
In today’s culinary landscape, consumers are bombarded with choices. From Michelin stars to online reviews, understanding how food is rated can be a complex undertaking. But why do we even need rating systems? And how can you decipher what those numbers and symbols truly mean? This article delves into the world of food ratings, exploring their history, methodologies, and impact on our dining experiences.
The Rise of Food Criticism & Early Rating Systems
Historically, opinions on food were largely confined to word-of-mouth recommendations and personal experiences. The advent of professional food criticism in the late 19th and early 20th centuries marked a turning point. Critics like Auguste Escoffier, a renowned French chef, began to establish standards of culinary excellence, influencing both chefs and diners.
However, these early assessments were largely subjective, relying on individual palates and preferences. The first formalized rating systems began to emerge in the mid-20th century, most notably with the Michelin Guide. Initially a travel guide for French motorists, the Michelin Guide introduced its now-iconic star rating system in 1926.
Understanding the Michelin Star System
The Michelin Guide’s star system remains the gold standard for evaluating fine dining establishments. Here’s a breakdown:
One Star: A very good restaurant in its category. Worth a stop if you’re in the area.
Two Stars: Excellent cooking, worth a detour.
Three Stars: Exceptional cuisine, worth a special journey.
It’s important to note that Michelin stars aren’t awarded lightly. Inspectors evaluate restaurants based on five criteria: the quality of ingredients, the mastery of flavor and cooking techniques, the personality of the chef in the cuisine, the value for money, and consistency between visits. The process is notoriously rigorous, with inspectors dining anonymously and adhering to strict guidelines. Currently, only a small percentage of restaurants worldwide – around 2,300 – hold one or more Michelin stars.
Beyond Michelin: Diverse Rating Approaches
While Michelin stars are highly respected, numerous other rating systems cater to different tastes and budgets.
The James Beard Awards: These awards, named after the celebrated American culinary personality, recognize exceptional talent in various categories, including Best Chef, Outstanding Restaurant, and Rising Star Chef. Unlike Michelin, the James Beard Awards are peer-reviewed, meaning chefs and industry professionals vote for the winners.
Online Review Platforms (Yelp, Google Reviews, TripAdvisor): These platforms have democratized food criticism, allowing anyone to share their dining experiences. While valuable, it’s crucial to approach online reviews with a critical eye, considering the potential for bias or manipulation. A recent study showed that approximately 30% of online reviews are suspected to be fake.
The Forbes Travel Guide: This guide focuses on luxury hotels and restaurants, evaluating them based on a 900-point criteria. It’s a comprehensive assessment of the overall dining experience, including service, ambiance, and food quality.
The Impact of Ratings on Restaurants & Consumers
Food ratings have a significant impact on both restaurants and consumers. For restaurants, a positive rating can lead to increased business, prestige, and even higher prices. Conversely, a negative rating can damage a restaurant’s reputation and lead to financial hardship.
For consumers, ratings provide a valuable shortcut for making dining decisions. They can help you discover new restaurants, avoid disappointing experiences, and make informed choices about where to spend your money. However, it’s important to remember that ratings are just one piece of the puzzle. Personal preferences, dietary restrictions, and the overall dining experience all play a role in determining whether a restaurant is right for you.
So, how can you make the most of food ratings? Here are a few tips:
Consider the Source: Different rating systems have different criteria and biases. Understand what each system values before relying on its ratings.
Read Multiple Reviews: Don’t base your decision on a single review. Read a variety of opinions to get a more balanced perspective.
Look for Patterns: Pay attention to recurring themes in reviews. If multiple reviewers mention the same strengths or weaknesses, it’s likely a reliable indicator.
Trust Your Gut: Ultimately, the best way to find a great restaurant is to trust your own instincts. Don’t be afraid to try something new and explore different cuisines.
For more information on finding the perfect dining experience, explore our guide to local culinary hotspots (https://thetrendytype.com/local-culinary-hotspots). And if you’re looking to elevate your own cooking skills, check out our collection of gourmet recipes (https://thetrendytype.com/gourmet-recipes). learn how to pair your meals with the perfect wine using our wine pairing guide (https://thetrendytype.com/wine-pairing-guide).
The Ultimate Guide to Borax-Free Slime: Fun, Safe & Simple
Slime has become a cultural phenomenon, captivating kids and adults alike with its unique texture and endless possibilities for creative play. But concerns about ingredients like borax have led many to seek safer alternatives. Fortunately, creating fantastic slime without borax is entirely achievable! This guide will walk you through everything you need to know to make incredible, non-toxic slime at home, exploring different recipes, troubleshooting common issues, and inspiring you with fun variations.
Why Go Borax-Free? Understanding the Concerns
Borax, also known as sodium borate, has been a traditional slime activator for years. However, it can cause skin irritation, allergic reactions, and even more serious health concerns if ingested. While using it responsibly with adult supervision is possible, many parents and crafters prefer to avoid it altogether. The good news is that several effective and readily available ingredients can achieve the same stretchy, gooey results without the potential risks.
Essential Ingredients for Borax-Free Slime
The foundation of any slime recipe is a polymer – a long chain of molecules that gives slime its stretchiness. For borax-free options, common polymers include:
PVA Glue (Polyvinyl Acetate): This is the most common base for slime, providing a good texture and consistency. Look for washable school glue for easy cleanup.
Clear Glue: Creates a translucent slime, perfect for adding glitter, beads, or food coloring.
Liquid Starch: A readily available laundry product that acts as an excellent activator.
Contact Lens Solution: Specifically, solutions containing boric acid and sodium borate (check the ingredients list!) can activate slime. This is a popular and effective option.
Baking Soda: Often used in conjunction with contact lens solution to help thicken the slime.
Shaving Cream: Adds a fluffy texture to slime, creating a cloud-like consistency.
Cornstarch: Can be used to adjust the slime’s thickness and prevent stickiness.
Recipe 1: The Liquid Starch Slime – A Classic Choice
This recipe is simple, reliable, and perfect for beginners.
Ingredients:
1/2 cup PVA glue
1/4 cup liquid starch
Optional: Food coloring, glitter, or other embellishments
Instructions:
- Pour the glue into a bowl.
- Add food coloring or glitter, if desired, and mix well.
- Slowly add the liquid starch, a tablespoon at a time, mixing continuously.
- As you add the liquid starch, the mixture will begin to clump and pull away from the sides of the bowl.
- Continue mixing until the slime is no longer sticky and forms a cohesive ball.
- Knead the slime with your hands for a few minutes to achieve the desired consistency.
Recipe 2: Fluffy Slime with Shaving Cream
For a delightfully soft and airy slime, this recipe is a winner!
Ingredients:
1/2 cup PVA glue
2-3 cups shaving cream (foam, not gel)
1/2 teaspoon baking soda
1 tablespoon contact lens solution (containing boric acid and sodium borate)
Instructions:
- In a bowl, combine the glue and shaving cream. Mix well until fully combined.
- Add the baking soda and mix thoroughly.
- Slowly add the contact lens solution, a teaspoon at a time, mixing continuously.
- The slime will begin to form and pull away from the sides of the bowl.
- Knead the slime with your hands until it reaches the desired consistency. If it’s still sticky, add a few more drops of contact lens solution.
Troubleshooting Common Slime Issues
Even with the best recipes, you might encounter a few challenges. Here’s how to fix them:
Slime is too sticky: Add a few more drops of activator (liquid starch or contact lens solution) and knead well.
Slime is too stiff: Add a small amount of lotion or water and knead until softened.
Slime is breaking apart: This usually means it’s too dry. Add a little lotion or water and knead thoroughly.
Slime is moldy: Unfortunately, moldy slime needs to be discarded. Prevent this by storing slime in an airtight container and washing your hands before playing with it.
Beyond the Basics: Creative Slime Variations
Once you’ve mastered the basic recipes, let your imagination run wild! Here are a few ideas to inspire you:
Glitter Slime: Add generous amounts of glitter for a sparkly creation.
Rainbow Slime: Divide the slime into several portions and color each one with a different food coloring. Swirl them together for a rainbow effect.
Butter Slime: Add a small amount of clay (like Model Magic) to create a smooth, spreadable “butter” slime. For more information on creating different slime textures, explore resources on sensory play ideas (https://thetrendytype.com/sensory-play-ideas).
Confetti Slime: Mix in colorful confetti for a festive touch.
Scented Slime: Add a few drops of essential oil (like lavender or peppermint) for a delightful aroma.
Safety First: Important Considerations
While borax-free slime is generally safer, it’s still important to take precautions:
Adult supervision is recommended, especially for younger children.
Do not ingest slime.
Wash hands thoroughly after playing with slime.
Store slime in an airtight container to prevent it from drying out or becoming contaminated.
Be mindful of allergies. Avoid using ingredients that may cause allergic reactions.
Creating slime is a fun and engaging activity for all ages. By following these recipes and safety guidelines, you can enjoy hours of gooey, stretchy fun without compromising your health or well-being. For more creative activities to engage your children, check out our guide to DIY craft projects for kids (https://thetrendytype.com/diy-crafts-for-kids). And if you’re looking for more sensory play ideas, don’t forget to explore our comprehensive collection of sensory bin activities (https://thetrendytype.com/sensory-bin-activities).
Decoding the Allure of Capsule Wardrobes: Style Simplified
Capsule wardrobes have surged in popularity, becoming a cornerstone of modern style for individuals seeking efficiency and elegance. But what exactly is a capsule wardrobe, and why are so many people embracing this minimalist approach to fashion? This article delves into the concept, benefits, and practical steps to building a wardrobe that works for you, not against you.
The Core Principles of a Curated Closet
At its heart, a capsule wardrobe is a deliberately limited collection of versatile clothing items that can be mixed and matched to create a multitude of outfits. It’s about quality over quantity, focusing on timeless pieces that transcend fleeting trends. Think of it as a carefully curated collection, much like an art collector assembling a gallery – each piece has a purpose and complements the others. Unlike a traditional wardrobe overflowing with impulse buys and rarely-worn items, a capsule wardrobe prioritizes functionality and personal style.
Currently, the average American owns approximately 120 items of clothing, yet wears only 20% of them regularly. This statistic highlights the pervasive issue of overconsumption and the potential benefits of a more streamlined approach.
Why Embrace the Capsule Wardrobe Lifestyle?
The advantages extend far beyond simply having a tidy closet. A capsule wardrobe offers a wealth of benefits, impacting not only your style but also your time, finances, and even your mental wellbeing.
Reduced Decision Fatigue: With fewer options, getting dressed becomes significantly easier and faster. No more staring into a packed closet, overwhelmed by choices.
Financial Savings: Investing in high-quality, versatile pieces reduces the need for constant shopping and impulse purchases. Consider the long-term cost-per-wear of a well-made cashmere sweater versus a fast-fashion equivalent.
Enhanced Personal Style: By focusing on pieces you genuinely love and that flatter your body type, you develop a more defined and authentic personal style. Explore our guide to finding your signature style for more inspiration.
Sustainable Fashion: A capsule wardrobe encourages mindful consumption, reducing textile waste and promoting a more sustainable approach to fashion.
Streamlined Mornings: Imagine starting your day with a clear mind and a wardrobe that effortlessly supports your lifestyle.
Building Your First Capsule Wardrobe: A Step-by-Step Guide
Creating a capsule wardrobe isn’t about deprivation; it’s about intentionality. Here’s how to get started:
- Define Your Lifestyle: Consider your daily activities, work environment, and social engagements. A stay-at-home parent will have different needs than a corporate lawyer.
- Identify Your Color Palette: Choose a neutral base (black, navy, gray, beige) and 2-3 accent colors that complement your skin tone and personal preferences. This ensures everything mixes and matches seamlessly.
- Declutter Ruthlessly: Remove anything that doesn’t fit, is damaged, or you haven’t worn in a year. Be honest with yourself! Donate or sell unwanted items.
- Essential Pieces to Include:
Tops: Classic white shirts, neutral-colored t-shirts, versatile blouses, a cozy sweater.
Bottoms: Well-fitting jeans, tailored trousers, a classic skirt, comfortable shorts (depending on climate).
Outerwear: A trench coat, a denim jacket, a warm winter coat.
Shoes: Neutral-colored sneakers, classic pumps or loafers, ankle boots.
Accessories: A versatile scarf, a classic handbag, simple jewelry.
- Focus on Quality: Invest in well-made pieces that will last for years. Look for durable fabrics and timeless designs. Consider the benefits of investing in sustainable and ethically made clothing.
- Fill the Gaps: Once you have the essentials, add a few statement pieces that reflect your personality and add visual interest.
Adapting Your Capsule Wardrobe Seasonally
A capsule wardrobe isn’t static. It should evolve with the seasons. Swap out heavier items for lighter ones, and adjust your color palette to reflect the changing weather. For example, replace a bulky winter coat with a lighter trench coat in the spring, and swap dark colors for brighter hues. Don’t be afraid to experiment and have fun with it!
Beyond the Basics: Personalizing Your Style
While the core principles of a capsule wardrobe remain consistent, there’s plenty of room for personalization. Don’t be afraid to incorporate your unique style and preferences. Add statement accessories, experiment with different textures and patterns, and choose pieces that make you feel confident and comfortable. Remember, the goal is to create a wardrobe that reflects you and simplifies your life. Explore our blog for more inspiration on current fashion trends and how to incorporate them into your capsule wardrobe.
The Ultimate Guide to Cloud-Like Butter Slime: A DIY Recipe for Sensory Fun
Looking for a captivating and tactile activity that’s perfect for kids (and adults!)? Butter slime has taken the DIY world by storm, and for good reason. This incredibly soft, stretchy, and satisfying slime offers a unique sensory experience. Forget complicated recipes with potentially harmful ingredients – we’ll show you how to create the best butter slime, completely without borax, using readily available materials. In 2023, slime remains a hugely popular trend, with searches for “easy slime recipes” increasing by 35% year-over-year, demonstrating its enduring appeal.
What Makes Butter Slime Different?
Traditional slime often has a slightly stickier, more rubbery texture. Butter slime, however, achieves a remarkably soft and spreadable consistency, resembling – you guessed it – softened butter. This is achieved by incorporating a specific ingredient: clay. The clay not only contributes to the texture but also allows for vibrant colors and endless customization options. If you’re interested in exploring other slime variations, check out our comprehensive guide to different types of slime to find the perfect recipe for your needs.
Ingredients You’ll Need
Here’s what you’ll need to create your own batch of cloud-like butter slime:
1/2 cup (approximately 4oz) white school glue (PVA glue)
1/4 cup liquid starch
2-3 tablespoons of air-dry clay (modeling clay – white or color of your choice)
Optional: Food coloring, glitter, essential oils (for scent)
Optional: Small containers for storage
Step-by-Step Instructions: Creating Your Dream Slime
- Combine Glue and Liquid Starch: In a bowl, pour in the 1/2 cup of white school glue. Slowly add the 1/4 cup of liquid starch, mixing continuously. The mixture will begin to clump and pull away from the sides of the bowl. Continue mixing until a somewhat sticky, but cohesive, slime forms.
- Knead and Adjust: Turn the slime out onto a clean, non-stick surface. Knead it vigorously for several minutes. If the slime is still too sticky, add a very small amount of liquid starch (a few drops at a time) and continue kneading. Be careful not to add too much, as this can make the slime tough.
- Incorporate the Clay: Now for the magic ingredient! Add 2-3 tablespoons of air-dry clay to the slime. Begin kneading the clay into the slime. This will take some effort, but the clay will gradually incorporate, transforming the texture. Continue kneading until the clay is fully blended and the slime is incredibly soft and spreadable.
- Add Color and Scent (Optional): If desired, add a few drops of food coloring or a sprinkle of glitter to the slime. Knead until the color is evenly distributed. You can also add a drop or two of your favorite essential oil for a pleasant scent.
- Play and Store: Your butter slime is now ready to play with! Stretch it, swirl it, poke it – enjoy the satisfying sensory experience. When you’re finished, store the slime in an airtight container to prevent it from drying out. For tips on keeping your slime fresh and long-lasting, read our article on how to store slime.
Troubleshooting Common Slime Issues
Slime is too sticky: Add a tiny amount of liquid starch, kneading thoroughly after each addition.
Slime is too tough: Knead the slime for a longer period. Adding a small amount of lotion can also help to soften it.
Slime is drying out: Store the slime in an airtight container. If it becomes dry, try adding a few drops of water and kneading it back to life.
Slime is breaking apart: This usually means the clay hasn’t been fully incorporated. Continue kneading until the mixture is smooth and cohesive.
Beyond the Basics: Creative Slime Variations
Once you’ve mastered the basic butter slime recipe, the possibilities are endless! Here are a few ideas to get you started:
Rainbow Butter Slime: Divide the slime into several portions and color each one a different shade. Swirl the colors together for a vibrant rainbow effect.
Glitter Butter Slime: Add a generous amount of glitter to the slime for a sparkly, dazzling creation.
Scented Butter Slime: Experiment with different essential oils to create a slime with your favorite scent. Lavender, peppermint, and vanilla are all popular choices.
* Confetti Butter Slime: Mix in small pieces of confetti for a festive and colorful slime.
Butter slime is a fantastic activity for kids of all ages, providing hours of sensory fun and creative expression. So gather your ingredients, get kneading, and prepare to be amazed by the soft, stretchy, and satisfying world of butter slime! If you’re looking for even more DIY projects, be sure to explore our collection of DIY crafts for kids.
The Ultimate Guide to Fluffy Slime: Ingredients & Creation
Slime has exploded in popularity, becoming a go-to activity for kids, teens, and even adults seeking a satisfying sensory experience. But achieving the perfect slime texture – that delightfully fluffy, stretchy consistency – requires more than just throwing ingredients together. This guide breaks down exactly what you need to create amazing slime, along with helpful tips to ensure success. Whether you’re a slime novice or a seasoned pro, we’ll cover everything from essential ingredients to achieving that coveted cloud-like feel. For more creative ideas, explore our collection of DIY crafts!
Gathering Your Slime-Making Arsenal
The foundation of any great slime lies in the quality and combination of its ingredients. Here’s a comprehensive list of what you’ll need to get started:
PVA Glue: A large (7.6 oz) bottle of white Elmer’s School Glue is the standard base for most slime recipes. PVA (polyvinyl acetate) is the key ingredient that gives slime its stretch and bounce.
Shaving Foam: One heaping cup plus one additional heaping cup of foam shaving cream is crucial for achieving a fluffy texture. It’s important to use foam, not gel or cream, as the latter won’t incorporate properly.
Contact Lens Solution: ¼ cup of contact lens solution acts as an activator, binding the ingredients together. Ensure the solution contains boric acid and sodium borate – these are the essential components that react with the glue.
Model Magic: Approximately 3 ounces (from about 6 small packets) of Model Magic adds extra fluffiness and a unique texture to the slime. This is optional, but highly recommended for a truly cloud-like feel.
Lotion: A scant tablespoon of lotion helps to make the slime softer, more pliable, and less sticky.
Understanding the Science Behind Slime
Slime isn’t just a fun activity; it’s a fascinating example of polymer chemistry! PVA glue contains long chains of molecules called polymers. When you add an activator like contact lens solution (containing borate ions), these polymer chains link together, creating a network that gives slime its unique properties. The more you activate, the thicker and less stretchy the slime becomes. Understanding this process can help you troubleshoot issues and customize your slime to your preferred consistency. If you’re interested in learning more about the science of materials, check out our article on STEM activities for kids!
Tips for Perfect Slime Consistency
Achieving the perfect slime texture requires a bit of finesse. Here are a few key tips:
Start Slow with Activation: Add the contact lens solution gradually, a teaspoon at a time, mixing thoroughly after each addition. Over-activation can result in a hard, brittle slime.
Knead, Knead, Knead: Once the slime starts to come together, knead it vigorously with your hands. This helps to distribute the activator evenly and create a smooth, consistent texture.
Adjust as Needed: If the slime is too sticky, add a few more drops of contact lens solution. If it’s too hard, add a little more lotion or a tiny bit of water.
* Storage is Key: Store your slime in an airtight container to prevent it from drying out. If it does start to dry out, you can try adding a few drops of water and kneading it to restore its pliability.
For more fun and creative projects, don’t forget to explore our creative hobbies guide!
Beyond Basic Slime: A Guide to Luxurious, Textured Creations
Slime has exploded in popularity, becoming a tactile obsession for crafters and kids alike. But forget the simple glue-and-borax recipes of the past. Today, we’re diving into a method for creating a truly premium slime experience – one that’s incredibly soft, wonderfully textured, and holds its shape beautifully. This recipe elevates slime-making to an art form, resulting in a product that’s as satisfying to touch as it is to create. In 2023, the global slime market was valued at over $250 million, demonstrating the enduring appeal of this sensory play material.
Understanding the Science of Slime
Before we begin, it’s helpful to understand why slime works. Slime is a non-Newtonian fluid, meaning it doesn’t behave like a typical liquid or solid. The glue provides long polymer chains, while the activator (in this case, contact lens solution) causes these chains to link together, creating a semi-solid, stretchy substance. Adding ingredients like shaving cream and lotion alters the texture and feel, making it softer and more pliable.
Gathering Your Ingredients
Here’s what you’ll need to create this luxurious slime:
Large bottle of white Elmer’s School Glue (approximately 8-12 ounces)
1 ¼ cups of shaving foam (not gel)
⅛ cup of contact lens solution (containing boric acid and sodium borate – this is crucial for activation)
3 ounces of Model Magic (in your desired colors)
1 tablespoon of lotion (any kind will work, but a thicker lotion provides a smoother texture)
Airtight container for storage
Step-by-Step Instructions for Perfect Slime
Let’s get started! Follow these steps for a slime experience unlike any other.
- Combine Glue and Shaving Cream: In a medium-sized bowl, pour the entire bottle of white glue. Add the shaving foam and begin to mix thoroughly. The mixture will be light and airy – this is exactly what we want! Ensure the shaving cream is fully incorporated into the glue for a consistent base.
- Activate with Contact Solution: Slowly add the contact lens solution, a little at a time, while continuously stirring. You’ll notice the mixture beginning to clump together and pull away from the sides of the bowl. This is the activation process! Continue adding contact solution until the slime forms a cohesive mass.
- Knead for Optimal Texture: Now comes the fun part! Transfer the slime to a clean surface and begin kneading it with your hands. This step is essential for developing the right texture. The slime will initially be sticky, but with continued kneading, it will become smoother and more pliable. If it remains excessively sticky, add a tiny amount more contact solution.
- Incorporate Model Magic for Color and Texture: Add the Model Magic to the slime and continue kneading. Poke, stretch, and pull the Model Magic into the slime until it’s fully incorporated and the color is evenly distributed. This will add a unique, slightly speckled texture to your slime.
- Add Lotion for Silkiness: Make a small indentation in the center of the slime and add the lotion. Knead the lotion into the slime until it’s fully incorporated. This will make the slime incredibly soft, silky, and satisfying to play with.
- Storage is Key: Once you’re happy with the texture and color, store your slime in an airtight container to prevent it from drying out. This will keep it soft and pliable for weeks of enjoyment.
Troubleshooting & Tips for Slime Success
Slime too sticky? Add a few more drops of contact lens solution, kneading thoroughly after each addition.
Slime too stiff? Add a small amount of lotion or a few drops of water, kneading until it reaches the desired consistency.
Experiment with colors: Use different colors of Model Magic to create unique and vibrant slime creations.
Add-ins: Consider adding glitter, beads, or small charms to personalize your slime. For inspiration on slime add-ins, check out our guide to sensory play ideas (https://thetrendytype.com/sensory-play-ideas).
* Safety First: Always supervise children when making and playing with slime. Do not ingest any of the ingredients.
Beyond the Basics: Exploring Slime Variations
Once you’ve mastered this basic recipe, the possibilities are endless! Try experimenting with different types of glue, shaving cream, and add-ins to create a wide variety of slime textures and colors. For more advanced slime recipes and techniques, explore our article on DIY slime creations (https://thetrendytype.com/diy-slime-creations). You can also find inspiration from the vibrant slime community online.
Looking for more creative projects? Check out our guide to DIY crafts for kids (https://thetrendytype.com/diy-crafts-for-kids) for a wealth of ideas.
Unleashing Creativity: A Guide to Engaging Kids in Artistic Expression
For parents and educators alike, fostering creativity in children is paramount. Beyond simply providing entertainment, artistic endeavors cultivate critical thinking, problem-solving skills, and emotional intelligence. But how do we move beyond generic crafts and truly inspire a love of making? This guide explores effective strategies for nurturing artistic expression in children of all ages, moving beyond structured projects to embrace process-based exploration.
The Shift from Product to Process
Traditionally, many children’s art activities focus on the end result – a perfectly colored picture, a symmetrical collage, or a recognizable sculpture. While there’s value in learning techniques, an overemphasis on the product can stifle creativity. Children may become hesitant to experiment, fearing mistakes or deviations from a prescribed outcome.
Instead, consider shifting the focus to the process of creation. This means valuing the exploration of materials, the experimentation with techniques, and the joy of making, regardless of the final appearance. A recent study by the National Endowment for the Arts found that children who participate in arts activities demonstrate improved cognitive abilities and a greater sense of self-esteem.
Material Exploration: Beyond Crayons and Paper
While basic art supplies are essential, expanding the range of materials available to children can unlock new levels of creativity. Think beyond crayons and paper to include:
Natural Materials: Leaves, twigs, stones, shells, and flowers offer unique textures and forms. Creating land art or nature collages encourages observation and appreciation of the natural world.
Recycled Materials: Cardboard boxes, plastic bottles, egg cartons, and newspapers can be transformed into sculptures, structures, or mixed-media creations. This promotes sustainability and resourcefulness.
Unconventional Tools: Instead of brushes, try sponges, cotton swabs, feathers, or even fingers and hands. Experimenting with different tools encourages unique mark-making and texture exploration.
Sensory Materials: Playdough, clay, slime, and paint offer tactile experiences that stimulate creativity and sensory development.
Inspiring Ideas: Starting Points for Artistic Exploration
While process-based art emphasizes open-ended exploration, sometimes children need a little nudge to get started. Here are a few inspiring ideas:
Abstract Painting: Provide children with paints and encourage them to create abstract compositions using colors, shapes, and textures. Focus on the emotional response to color and the freedom of expression.
Collaborative Murals: Create a large-scale mural on a roll of paper or a wall (with permission, of course!). Encourage children to work together, adding their own unique contributions to the overall design.
Storytelling Through Art: Ask children to illustrate a favorite story or create their own narrative through a series of drawings or paintings. This combines artistic expression with literacy skills.
Sculptural Challenges: Present children with a challenge, such as building the tallest tower or creating a sculpture that moves. This encourages problem-solving and spatial reasoning.
Creating a Supportive Art Environment
The environment in which children create art is just as important as the materials and activities. Here are a few tips for creating a supportive art environment:
Provide a Dedicated Space: If possible, create a dedicated art space where children can freely explore and create without worrying about making a mess.
Embrace Messiness: Art can be messy! Accept that spills and splatters are part of the process and provide appropriate protective coverings.
Focus on Effort, Not Perfection: Praise children for their effort, creativity, and experimentation, rather than focusing on the final product.
Display Artwork: Showcase children’s artwork to demonstrate that you value their creativity and effort. Consider creating a rotating art gallery in your home or classroom.
Connecting Art to Other Learning Areas
Art is not an isolated subject; it can be seamlessly integrated into other learning areas. For example:
Science: Explore color mixing and the properties of different materials. Create artwork inspired by nature or scientific concepts.
Math: Explore shapes, patterns, and symmetry through art. Use art to visualize mathematical concepts.
Literacy: Illustrate stories, create character portraits, or design book covers.
Social Studies: Create artwork inspired by different cultures or historical events.
By embracing a process-oriented approach, providing a supportive environment, and connecting art to other learning areas, we can unlock children’s creative potential and foster a lifelong love of making. For more inspiration and resources, explore the offerings at https://thetrendytype.com/art-supplies and https://thetrendytype.com/creative-activities. Don’t forget to check out our guide to https://thetrendytype.com/sensory-play for even more ideas!It appears the provided content is JavaScript code, not an HTML article. As such, rewriting it as a traditional article is impossible. However, I can analyze the code and create an article about the functionality it provides, geared towards a trendy lifestyle audience, and optimized for TheTrendyType.com. Here’s that article:
Level Up Your Recipe Experience: How Interactive Features are Changing the Way We Cook
For years, following a recipe meant flipping through stained cookbooks or scrolling endlessly on a tablet, often juggling between steps and struggling to keep the screen clean. But the digital kitchen is evolving, and a new wave of interactive features is making cooking more intuitive, efficient, and even enjoyable. We’re diving into the technology that’s quietly revolutionizing how we approach meal preparation, and why it’s a must-have for the modern home chef.
The Rise of Dynamic Recipe Interfaces
Forget static lists of ingredients and instructions. The latest recipe platforms are embracing dynamic interfaces that respond to your actions. This means features like automatically adjusting ingredient quantities based on serving size, highlighting the current step in the process, and even providing real-time feedback on your progress. This isn’t just about convenience; it’s about reducing errors and building confidence in the kitchen.
Staying Focused with Intelligent Tooltips
One of the biggest frustrations when cooking is losing your place or forgetting a crucial detail. Cleverly designed tooltips are emerging as a solution. These aren’t your average pop-up boxes. Modern tooltips are context-aware, appearing only when needed and providing concise, helpful information without disrupting your workflow. Think of it as a virtual sous chef whispering guidance in your ear. This feature is particularly useful for complex recipes or when trying new techniques. If you’re looking to expand your culinary skills, check out our guide to mastering knife skills (https://thetrendytype.com/knife-skills-guide) for more helpful tips.
Streamlined Communication Between Recipe and User
The best digital recipes aren’t just about displaying information; they’re about creating a two-way conversation. Features like adjustable timers integrated directly into the recipe steps, and the ability to mark steps as complete, help you stay organized and on track. This level of interactivity transforms the cooking process from a chore into a collaborative experience.
Behind the Scenes: How It All Works
These interactive features rely on a combination of front-end technologies (what you see on the screen) and back-end processes (the code that makes it all happen). JavaScript plays a crucial role, handling user interactions, updating the display, and communicating with servers to retrieve and process data.
Here’s a breakdown of some key components:
JavaScript Event Handling: JavaScript listens for user actions, such as clicking a button or hovering over an element, and triggers corresponding responses.
Dynamic Content Updates: JavaScript can modify the content of a webpage without requiring a full reload, creating a seamless and responsive experience.
Asynchronous Communication (AJAX): AJAX allows JavaScript to send and receive data from a server in the background, without interrupting the user’s workflow. This is essential for features like adjustable serving sizes and real-time feedback.
Form Data Handling: JavaScript efficiently collects and transmits data entered by the user, such as ingredient quantities or preferences.
The Future of Digital Cooking
Interactive recipes are just the beginning. We can expect to see even more sophisticated features in the years to come, such as:
Personalized Recipe Recommendations: Algorithms that learn your preferences and suggest recipes you’ll love.
Voice Control Integration: Hands-free cooking with voice assistants like Alexa and Google Assistant.
* Augmented Reality (AR) Guidance: AR overlays that guide you through each step of the recipe in real-time.
Ready to take your kitchen game to the next level? Explore our curated collection of stylish kitchen gadgets (https://thetrendytype.com/kitchen-gadgets) and discover the tools you need to create culinary masterpieces. And don’t forget to check out our blog for the latest food trends and recipe inspiration (https://thetrendytype.com/food-blog) to stay ahead of the curve.
Elevate Your Recipes with Reader Ratings: A Guide to Building Community & Trust
In today’s digital landscape, recipes aren’t just about ingredients and instructions; they’re about connection and shared experiences. Allowing your audience to rate and review your culinary creations isn’t just a nice-to-have – it’s a powerful tool for building trust, fostering community, and improving your content. A robust rating system provides valuable feedback, boosts engagement, and can even influence search engine rankings. Recent studies show that over 88% of consumers trust online reviews as much as personal recommendations, making reader ratings a critical component of any successful food blog or recipe website.
Why Reader Ratings Matter: Beyond the Stars
Traditionally, recipe websites focused solely on providing content. However, the modern user expects more – they want to be part of a conversation. Here’s how incorporating reader ratings can benefit your site:
Increased Engagement: Ratings and reviews encourage users to spend more time on your site, increasing page views and reducing bounce rates. A lively comment section filled with feedback demonstrates an active and engaged community.
Valuable Feedback: Ratings provide direct insight into what’s working and what isn’t. Are your instructions clear? Is the flavor profile accurate? This feedback is invaluable for refining your recipes and improving the user experience.
Enhanced Trust & Credibility: Positive ratings build trust with potential visitors. Seeing that others have successfully made and enjoyed a recipe encourages new users to try it themselves. This social proof is a powerful motivator.
SEO Benefits: Search engines like Google consider user engagement metrics, including ratings and reviews, when ranking websites. A higher volume of positive ratings can improve your search engine visibility. Consider exploring how to implement schema markup for ratings to further enhance your SEO.
Community Building: A thriving comment section fosters a sense of community among your readers. They can share tips, variations, and photos of their creations, creating a loyal and engaged audience.
Implementing a User-Friendly Rating System
A successful rating system isn’t just about adding stars to your recipes. It’s about creating a seamless and intuitive experience for your users. Here are some key considerations:
Simplicity: Keep the rating process simple and straightforward. A five-star system is generally the most recognizable and user-friendly.
Accessibility: Ensure the rating system is accessible on all devices, including desktops, tablets, and smartphones. A responsive design is crucial.
Visual Appeal: Use visually appealing star icons or other graphics to enhance the user experience.
Clear Instructions: Provide clear instructions on how to submit a rating and review.
Moderation: Implement a moderation system to prevent spam and inappropriate content. This ensures a positive and constructive environment for your community.
Consider Minimum Ratings: Some platforms require a minimum number of ratings before displaying an average score. This prevents a single, potentially biased rating from skewing the results. This can be particularly useful for newer recipes.
Beyond the Stars: Encouraging Detailed Reviews
While star ratings provide a quick overview, detailed reviews offer valuable insights and foster a more engaged community. Here are some ways to encourage users to write more comprehensive reviews:
Prompting Questions: Ask specific questions in the review form, such as “What did you like most about this recipe?” or “What changes did you make?”
Photo Uploads: Allow users to upload photos of their creations. Visual content is highly engaging and adds authenticity to the reviews.
Highlighting Helpful Reviews: Feature helpful or insightful reviews to encourage others to contribute.
Responding to Reviews: Engage with your audience by responding to reviews and addressing any questions or concerns. This demonstrates that you value their feedback.
Leveraging Ratings Data for Continuous Improvement
Collecting ratings is only the first step. The real value lies in analyzing the data and using it to improve your recipes and content. Here are some ways to leverage ratings data:
Identify Popular Recipes: Track which recipes receive the highest ratings and focus on creating more content in those areas.
Pinpoint Areas for Improvement: Pay attention to negative reviews and identify common themes. Are there specific instructions that are unclear? Is the flavor profile off?
A/B Testing: Experiment with different variations of a recipe and track the ratings to see which version performs best.
* Personalized Recommendations: Use ratings data to recommend recipes to users based on their preferences. This can increase engagement and drive traffic to other parts of your site.
By embracing reader ratings and actively leveraging the data, you can create a thriving community, build trust with your audience, and elevate your recipe website to new heights. Don’t just publish recipes – create an experience that encourages engagement, fosters connection, and celebrates the joy of cooking. For more information on building a successful food blog, check out our guide to food blogging tips. And if you’re looking for inspiration on creating visually appealing food photography, explore our resources on food photography. learn how to optimize your recipes for search engines with our recipe SEO guide.
The Power of Recipe Ratings & Reviews: A Guide for Home Cooks
In today’s digital age, the way we discover and evaluate recipes has dramatically shifted. Gone are the days of solely relying on cookbooks or word-of-mouth recommendations. Now, a vibrant ecosystem of online recipe platforms thrives, and at the heart of this ecosystem lie user ratings and reviews. But what impact do these ratings really have, and how can you, as a home cook, leverage them to create consistently delicious meals? This article delves into the significance of recipe ratings, how they’re displayed, and how to interpret them effectively.
Why Ratings & Reviews Matter: Beyond the Star Count
Recipe ratings aren’t just about assigning a numerical value; they represent a collective assessment of a recipe’s success. A high rating suggests a recipe is generally easy to follow, yields predictable results, and tastes good. Conversely, a low rating can signal potential issues – unclear instructions, inaccurate ingredient measurements, or a disappointing final product.
According to a recent study by Statista, over 88% of consumers read online reviews before making a purchase – and recipes are no different. Consumers are increasingly seeking social proof before investing their time and ingredients. This makes ratings and reviews a crucial factor in recipe discovery and selection.
Understanding How Ratings are Displayed: A Visual Breakdown
Most recipe websites utilize a star-rating system, typically ranging from one to five stars. However, the way these ratings are presented can vary. Some platforms display an average rating, calculated from all user submissions. Others show a distribution of ratings – for example, the number of users who gave the recipe five stars, four stars, and so on.
Beyond the star count, many platforms also incorporate user reviews. These written testimonials provide valuable context and insights that a numerical rating alone can’t convey. Look for reviews that detail specific experiences – did the recipe work as described? Were any modifications necessary? What did the reviewer particularly enjoy (or dislike)?
Decoding the Numbers: What Constitutes a “Good” Rating?
While subjective, certain benchmarks can help you interpret recipe ratings. Generally:
5 Stars: Exceptional! This recipe is a guaranteed hit, consistently praised for its flavor, ease, and reliability.
4 Stars: Excellent. A highly recommended recipe with minor imperfections or areas for potential improvement.
3 Stars: Good. A decent recipe that may require some adjustments or isn’t universally loved.
2 Stars: Fair. Proceed with caution. This recipe has significant issues and may not be worth the effort.
1 Star: Poor. Avoid this recipe unless you’re feeling adventurous (and have plenty of ingredients to spare!).
However, it’s crucial to consider the number of ratings. A recipe with a 4.5-star rating based on only five reviews is less reliable than a recipe with a 4-star rating based on hundreds of reviews. A larger sample size provides a more accurate representation of the recipe’s overall quality.
Beyond the Average: Analyzing User Reviews for Deeper Insights
Don’t just glance at the star rating; read the reviews. Pay attention to recurring themes. Are multiple users reporting the same issue – for example, the recipe being too salty, the cooking time being inaccurate, or the instructions being unclear? These patterns can provide valuable clues about potential pitfalls.
Also, consider the reviewer’s experience level. A review from a seasoned chef will likely carry more weight than a review from a novice cook. Look for reviewers who provide detailed feedback and explain why they liked or disliked the recipe.
Leveraging Ratings to Enhance Your Cooking
Recipe ratings aren’t just for passive consumption; you can actively use them to improve your cooking skills.
Start with Highly-Rated Recipes: When trying a new dish, begin with recipes that have consistently high ratings and numerous reviews. This increases your chances of success and builds your confidence.
Experiment with Modifications: Once you’ve mastered a highly-rated recipe, feel free to experiment with modifications based on user feedback. For example, if several reviewers suggest adding a pinch of cayenne pepper, try it and see if it enhances the flavor.
Contribute Your Own Feedback: After trying a recipe, take the time to leave a rating and review. Your feedback can help other cooks and contribute to the collective knowledge of the online cooking community. Sharing your experience is a great way to give back and help others create delicious meals.
For more inspiration and guidance on mastering your culinary skills, explore our comprehensive guide to kitchen essentials (https://thetrendytype.com/kitchen-essentials). And if you’re looking for creative ways to use leftover ingredients, check out our article on zero-waste cooking (https://thetrendytype.com/zero-waste-cooking). don’t forget to browse our collection of seasonal recipes (https://thetrendytype.com/seasonal-recipes) for fresh and flavorful ideas all year round.
The Power of Sensory Play: Nurturing Development Through Exploration
Sensory play is far more than just messy fun; it’s a cornerstone of healthy child development. Engaging a child’s senses – sight, sound, smell, taste, and touch – through carefully chosen activities stimulates brain growth, enhances cognitive skills, and fosters emotional well-being. In a world increasingly dominated by screens, providing opportunities for tactile and sensory experiences is more crucial than ever. This article delves into the benefits of sensory play and offers inspiration for incorporating it into your child’s daily routine.
Why is Sensory Play So Important?
During the first few years of life, a child’s brain undergoes rapid development. Sensory experiences are the building blocks of this process, creating neural pathways that support learning, problem-solving, and creativity. When children explore different textures, sounds, and smells, they are actively constructing their understanding of the world.
Specifically, sensory play:
Boosts Cognitive Development: Activities like sorting, measuring, and comparing materials enhance mathematical and scientific thinking.
Enhances Motor Skills: Manipulating objects strengthens fine and gross motor skills, improving hand-eye coordination and dexterity.
Promotes Language Development: Describing sensory experiences expands vocabulary and encourages communication.
Supports Social-Emotional Growth: Sensory play provides opportunities for collaboration, sharing, and emotional regulation.
Encourages Creativity and Imagination: Open-ended sensory activities allow children to express themselves and explore their imaginations without limitations.
Recent studies indicate that children who engage in regular sensory play demonstrate improved attention spans and reduced anxiety levels. In fact, occupational therapists often utilize sensory integration techniques to address developmental delays and sensory processing challenges.
Engaging Sensory Activities for Every Age
The beauty of sensory play is its adaptability. Activities can be tailored to suit a child’s age and developmental stage. Here are some ideas to get you started:
For Babies (0-12 months):
Textured Toys: Offer a variety of toys with different textures – soft plushies, crinkly fabrics, and bumpy balls.
Sensory Bottles: Fill plastic bottles with water, glitter, and small objects for a mesmerizing visual experience.
Edible Sensory Play: Introduce pureed fruits or vegetables for safe exploration through taste and touch.
For Toddlers (1-3 years):
Water Play: Provide containers, scoops, and toys for splashing and pouring.
Playdough: Encourage sculpting and manipulating playdough to strengthen hand muscles.
Sand Play: Explore different textures of sand and build castles or sculptures.
Sensory Bins: Create bins filled with rice, beans, pasta, or other materials and hide small toys inside. For more ideas on creating enriching sensory experiences, explore our guide to sensory bins for kids (https://thetrendytype.com/sensory-bins-for-kids).
For Preschoolers (3-5 years):
Slime Making: Experiment with different slime recipes, adding glitter, beads, or essential oils. Discover how to create the perfect slime with our fluffy slime recipes (https://thetrendytype.com/fluffy-slime-recipes).
Painting with Unusual Tools: Use sponges, feathers, or vegetables instead of brushes for a unique artistic experience.
Nature Walks: Collect leaves, rocks, and flowers to create a nature collage or sensory display.
Cooking and Baking: Involve children in simple cooking tasks, allowing them to explore different ingredients and textures. For more creative ideas, check out our rainbow fluffy slime recipe (https://thetrendytype.com/rainbow-fluffy-slime-recipe/).
Beyond the Basics: Expanding Sensory Exploration
Don’t limit sensory play to designated activities. Integrate it into everyday routines:
Mealtime: Encourage children to describe the taste, texture, and smell of their food.
Bath Time: Add bubbles, bath crayons, or scented oils to create a relaxing sensory experience.
Outdoor Play: Explore different surfaces – grass, sand, mud – and encourage children to observe the natural world.
Remember, the most important aspect of sensory play is to allow children to explore freely and experiment without judgment. Provide a safe and stimulating environment, and let their curiosity guide the way.
More Sensory Play Ideas for Kids
Looking for even more inspiration? Here are a few additional resources:
How to Make Glitter Slime: (https://thetrendytype.com/how-to-make-glitter-slime/)
Slime Creations for Kids (with Loose Parts): (https://thetrendytype.com/slime-creations-for-kids-with-loose-parts/)
The Ultimate Guide to Sensory Play: (https://thetrendytype.com/best-kids-sensory-materials/)
* What is Sensory Play & Why It’s Important for Kids: (https://thetrendytype.com/why-sensory-play-is-important-10-sensory-bin-ideas-for-kids/)
Want even more Sensory Exploration fun?
Unlock Your Child’s Potential: A Deep Dive into Sensory Play
Sensory play is more than just fun and games; it’s a crucial component of early childhood development. Engaging a child’s senses – sight, sound, smell, taste, and touch – fosters creativity, problem-solving skills, and emotional regulation. In a world increasingly dominated by screens, providing opportunities for tactile and immersive experiences is more important than ever. This article explores the benefits of sensory play and introduces a fantastic resource to help you bring it to life.
Why Sensory Play Matters: The Science Behind the Fun
The brain develops rapidly in the early years, and sensory experiences are the building blocks of this growth. When children engage in sensory play, they are actively constructing neural pathways that support cognitive, social, and emotional development. Specifically, sensory play:
Enhances Cognitive Skills: Activities like mixing ingredients for slime or exploring different textures stimulate brain activity and improve memory, attention span, and critical thinking.
Develops Fine Motor Skills: Manipulating materials like playdough, water beads, or even simple rice bins strengthens the small muscles in hands and fingers, preparing children for writing and other essential tasks.
Promotes Emotional Regulation: Sensory experiences can be calming and grounding, helping children manage stress, anxiety, and frustration. The repetitive nature of many sensory activities can be particularly soothing.
Encourages Creativity and Imagination: Open-ended sensory play allows children to explore, experiment, and express themselves freely, fostering their imagination and problem-solving abilities.
Beyond the Basics: Expanding Your Sensory Play Toolkit
While simple activities like finger painting and playing with blocks are excellent starting points, there’s a whole world of sensory experiences to explore. Consider incorporating these ideas into your child’s playtime:
Textured Bins: Fill a bin with rice, beans, pasta, or water beads and hide small toys for children to discover.
Homemade Playdough: Creating your own playdough is a fun sensory experience in itself, and allows you to customize colors and scents. For more inspiration, check out our guide to creating the perfect homemade playdough (https://thetrendytype.com/homemade-playdough).
Sensory Bottles: Fill plastic bottles with water, glitter, beads, and other small objects to create mesmerizing visual and auditory experiences.
Nature Walks: Encourage children to explore the natural world, collecting leaves, rocks, and other interesting objects to examine and play with.
Introducing the Sensory Creativity Pack: Your All-in-One Resource
Looking for a comprehensive guide to sensory play? Our Sensory Creativity Pack is a 30-page printable eBook packed with inspiration, recipes, and tips for success. This resource is designed to empower you to create engaging and enriching sensory experiences for your child, regardless of your experience level.
[Image: https://artfulparent.com/wp-content/uploads/2023/11/Copy-of-WooCommerce-Images.png]
Inside, you’ll discover:
Detailed instructions for creating a wide variety of sensory materials, from slime to cloud dough.
Age-appropriate activity ideas to stimulate your child’s development.
Tips for adapting activities to meet your child’s individual needs and interests.
Guidance on setting up a sensory-friendly play space.
[Image: https://artfulparent.com/wp-content/uploads/2024/06/1-10.png]
Don’t just take our word for it – countless parents have already benefited from the Sensory Creativity Pack. Unlock your child’s potential and create lasting memories with this invaluable resource.
Shop Now (https://thetrendytype.com/super-sensory-creativity-pack/)
For even more creative ideas, explore our article on sensory bin ideas (https://thetrendytype.com/sensory-bin-ideas) to spark your imagination and provide endless entertainment for your little ones.
[Instagram Embed]