
Elevate Your Summer with Custom Spray-Dyed Towels
Table of Contents
- Elevate Your Summer with Custom Spray-Dyed Towels
- Why Choose Spray Dyeing?
- Gathering Your Supplies
- Step-by-Step Guide to Spray Dyeing Towels
- 1. Prepare Your Workspace
- 2. Fold and Secure Your Towel
- 3. Mix Your Dye (If Using Powder)
- 4. Apply the Dye
- 5. Let it Set
- 6. Rinse and Wash
- Beyond the Basics: Creative Techniques to Try
- Caring for Your Spray-Dyed Towels
- Preparing Your Workspace & Materials
- Designing with Tape: Creating Your Patterns
- Mixing the Dye: Achieving Vibrant Colors
- Spraying the Dye: Bringing Your Design to Life
- Drying & Revealing Your Masterpiece
- Revamp Your Summer with Vibrant Spray-Dyed Towels
- Why Choose Spray Dyeing?
- Gathering Your Supplies
- Step-by-Step Guide to Spray Dyeing Towels
- Ensuring Long-Lasting Color
- Beyond Towels: Expanding Your Dyeing Adventures
- Enjoy Your Colorful Creations!
- More Summer Craft Ideas
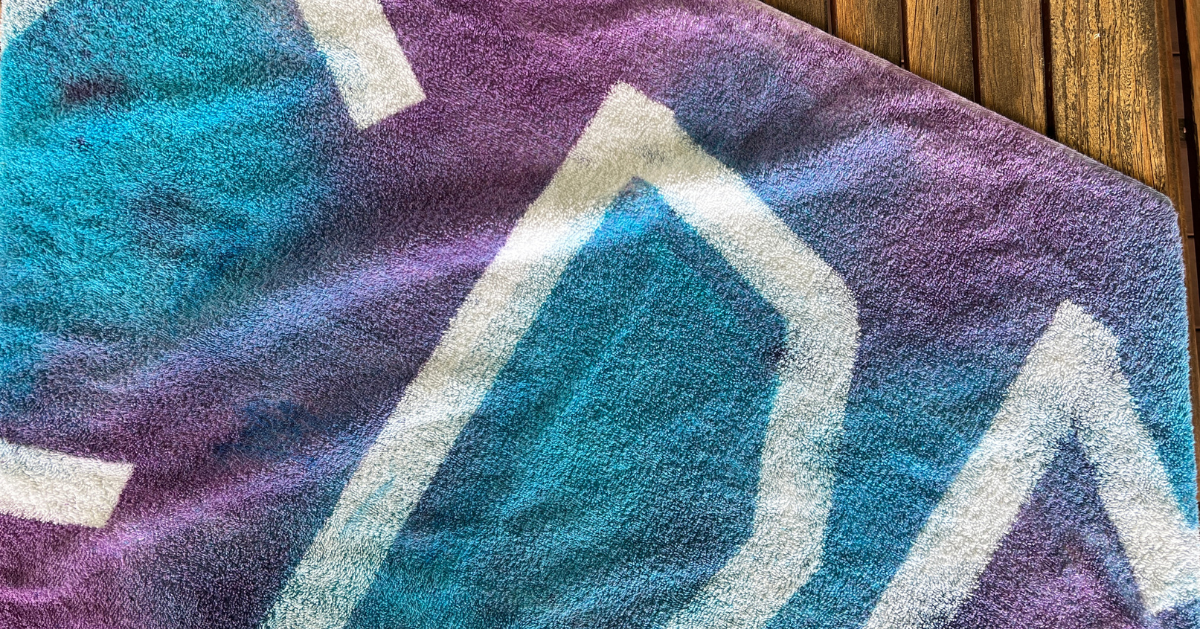
Summer is the season for vibrant creativity and personalized touches, and what better way to infuse some fun into your poolside or beach days than with custom-designed towels? Forget generic beachwear – this guide will walk you through the surprisingly simple process of spray dyeing towels, allowing you to create unique, eye-catching pieces that reflect your personal style. This project is perfect for families, offering a fun and engaging activity for all ages. In 2024, DIY textile projects are experiencing a resurgence, with a 25% increase in searches for personalized home décor, making this the perfect time to embrace your inner artist.
Why Choose Spray Dyeing?
While traditional tie-dye remains a beloved classic, spray dyeing offers a fresh approach with a few key advantages. It allows for greater control over color placement, enabling you to create gradients, patterns, and even stencils. The technique is also less messy than immersion dyeing, making it ideal for indoor or outdoor projects. Plus, the results are often softer and more vibrant, offering a premium look and feel.
Gathering Your Supplies
Before you begin, assemble the following materials:
White Cotton Towels: Opt for 100% cotton for the best dye absorption. You can find affordable options at most retailers – we recently found quality towels for around $5 each.
Spray Dye or Tie Dye Powder: Choose vibrant colors that suit your summer aesthetic. Consider a range of shades for a more dynamic look.
Masking Tape or Duct Tape: Essential for creating clean lines and defined patterns.
Workspace Protection: Cover your work surface with a plastic tablecloth, garbage bags, or cardboard to prevent staining.
Rubber Gloves: Protect your hands from dye exposure.
Plastic Spray Bottles: If using tie dye powder, you’ll need spray bottles to mix and apply the dye solution.
Clothespins & Drying Rack: For hanging and drying your finished towels.
Pro Tip: We’ve found that purchasing tie dye powder refills is more economical than buying complete kits. This allows you to build a diverse color palette and experiment with different dyeing techniques, like ice dyeing or traditional tie dye.
Step-by-Step Guide to Spray Dyeing Towels
1. Prepare Your Workspace
Lay down your protective covering to shield your work area from dye splatters. Ensure adequate ventilation, especially if working indoors. This is crucial for a safe and enjoyable crafting experience.
2. Fold and Secure Your Towel
Experiment with different folding techniques to create unique patterns. For a simple striped effect, fold the towel accordion-style. For more complex designs, try folding it into triangles or squares. Secure the folds tightly with masking tape or duct tape. The tighter the folds, the more defined your pattern will be.
3. Mix Your Dye (If Using Powder)
Following the instructions on your tie dye powder, mix the dye with water in a plastic spray bottle. Shake well to ensure the dye is fully dissolved.
4. Apply the Dye
Wearing rubber gloves, carefully spray the dye onto the folded towel. Start with a light mist and gradually build up the color intensity. Rotate the towel to ensure even coverage. Don’t be afraid to experiment with different colors and techniques. For a gradient effect, start with a darker shade at one end and gradually lighten it as you move towards the other.
5. Let it Set
Allow the dye to set for at least 6-8 hours, or preferably overnight. This will ensure the color is fully absorbed into the fabric.
6. Rinse and Wash
Remove the tape and carefully unfold the towel. Rinse it thoroughly with cold water until the water runs clear. Then, wash it separately in cold water with a mild detergent. Tumble dry on low heat or hang to dry.
Beyond the Basics: Creative Techniques to Try
Stenciling: Use stencils to create intricate designs on your towels. Secure the stencil with tape and spray the dye over it.
Ombre Effect: Create a gradual color transition by layering different shades of dye.
Splatter Painting: For a more abstract look, splatter the dye onto the towel using a brush or spray bottle.
Geometric Patterns: Use tape to create geometric shapes and spray the dye within the taped areas.
Caring for Your Spray-Dyed Towels
To keep your custom towels looking their best, follow these care instructions:
Wash separately in cold water with a mild detergent.
Avoid using bleach or fabric softeners.
Tumble dry on low heat or hang to dry.
* Iron on low heat if necessary.
With a little creativity and these simple steps, you can transform plain white towels into vibrant, personalized works of art. This project is not only fun and rewarding but also a great way to add a touch of summer style to your beach days and poolside lounging. For more inspiration on textile crafts, explore our guide to creating custom beach bags.
Unleash Creativity: A Fun Guide to DIY Spray Dye Towels
Looking for a vibrant and engaging craft project that’s perfect for kids and adults alike? Spray dye towels offer a fantastic way to personalize your linens and express your artistic flair. This guide will walk you through a simple, step-by-step process to create stunning, custom-designed towels, transforming ordinary fabric into unique works of art. Beyond being a fun activity, creating personalized items like towels is a great way to explore the world of textile crafts and add a personal touch to your home.
Preparing Your Workspace & Materials
Before you begin, proper preparation is key to a mess-free and enjoyable experience. The beauty of this project is its adaptability – you can use old towels for a refresh or opt for new, inexpensive options.
Surface Protection: Cover your work area with a protective layer. A large piece of cardboard is ideal, but plastic tablecloths or even heavy-duty trash bags will also work effectively. This prevents dye from staining surfaces.
Ventilation: It’s best to conduct this project outdoors whenever possible. This minimizes the risk of dye fumes and simplifies cleanup. If working indoors, ensure adequate ventilation by opening windows and doors.
Essential Supplies: Gather the following materials:
Towels (cotton or a cotton blend work best)
Masking tape or duct tape
Powdered fabric dye (available at most craft stores)
Spray bottles (empty and clean)
Water
Rubber gloves
Drying rack or clothesline
Designing with Tape: Creating Your Patterns
The possibilities are endless when it comes to designing your towel patterns. This is where creativity truly shines!
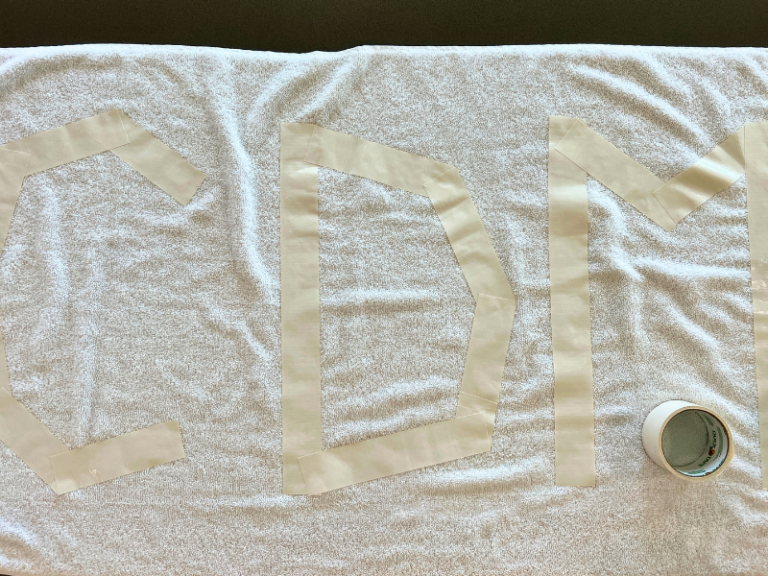
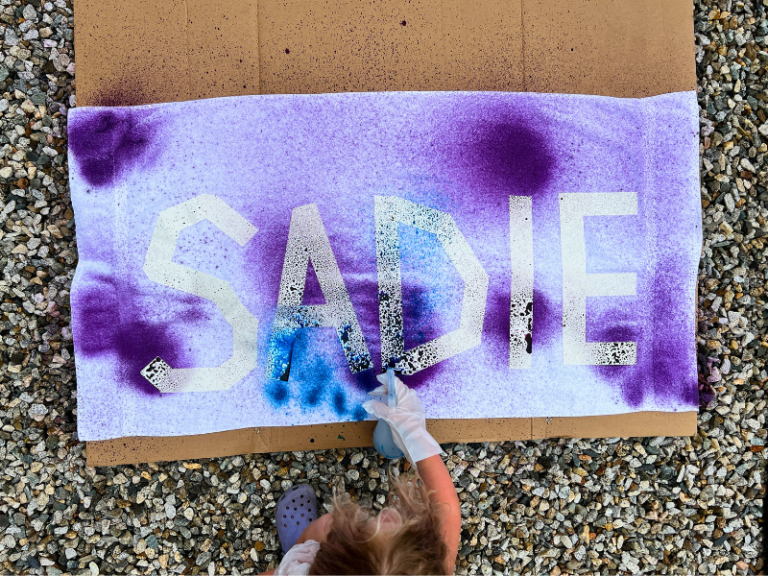
Tape Application: Use masking tape or duct tape to create your desired patterns on the towels. Encourage kids to personalize their towels with initials, names, or geometric designs. For a more abstract look, try stripes, polka dots, or freeform shapes.
Secure Adhesion: Press the tape firmly onto the towel fabric. This is crucial to prevent dye from seeping underneath and blurring the design. Take your time and ensure a tight seal along all edges of the tape.
Inspiration & Ideas: Browse online for DIY towel designs to spark your imagination. Consider using stencils for more intricate patterns or combining different tape widths for a textured effect.
!
Mixing the Dye: Achieving Vibrant Colors
Creating the dye solution is a simple process, but attention to detail ensures optimal color saturation.
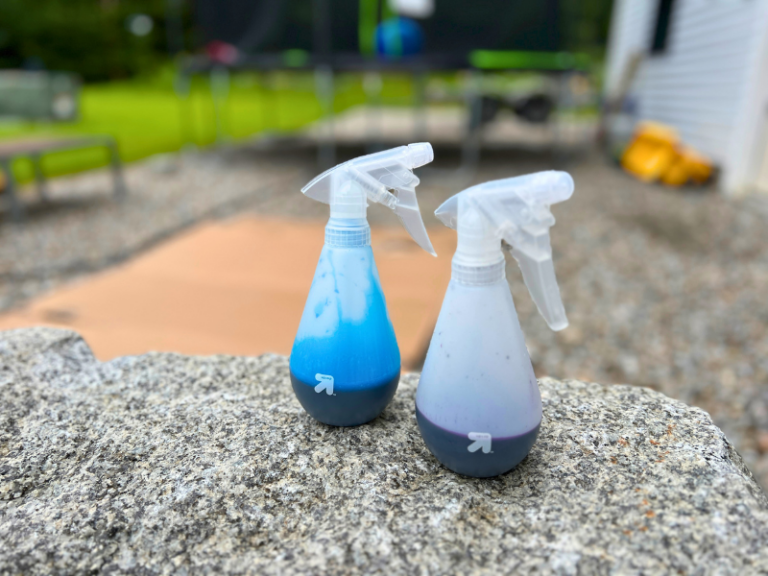
Powdered Dye Preparation: If using powdered dye, carefully add it to the empty spray bottles. A general guideline is to mix approximately 1-2 tablespoons of dye powder with 4 ounces of water per bottle. Adjust the amount of dye to achieve your desired color intensity.
Thorough Mixing: Secure the spray bottle lids and shake vigorously until the dye powder is completely dissolved and the solution is uniform in color. Any undissolved powder can clog the spray nozzle and result in uneven application.
Alternative Options: Consider using pre-mixed spray tie dye kits, which are readily available online and in craft stores. These kits offer convenience and a wide range of color options. For more information on color mixing, explore resources on fabric dyeing techniques.
!
Spraying the Dye: Bringing Your Design to Life
Now for the fun part – applying the dye and watching your design come to life!
Protective Gear: Before you begin spraying, put on rubber gloves to protect your hands from staining.
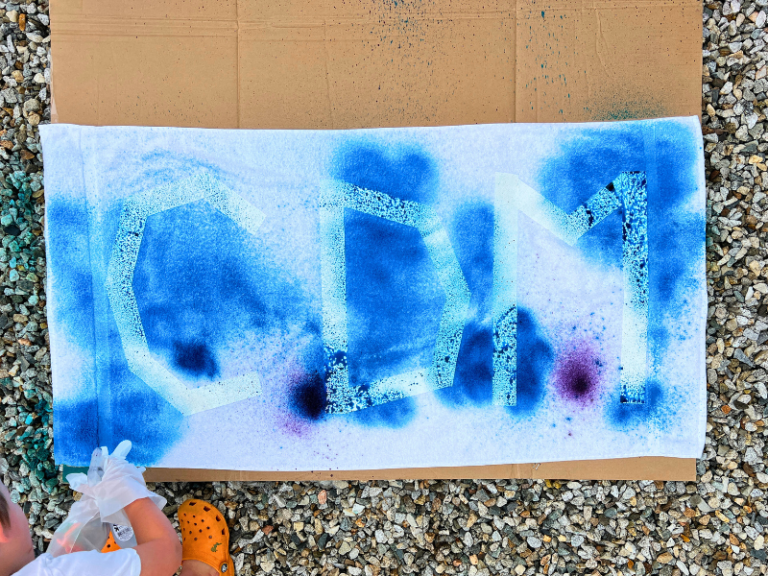
Dye Application: Lay the towel flat on the protected surface. Encourage kids to choose their favorite colors and start spraying the dye onto the towel. Experiment with different spraying techniques – short bursts, sweeping motions, and overlapping colors – to create unique blends and patterns.
Tape Resistance: The tape will act as a resist, preventing the dye from penetrating the fabric underneath. This will create a crisp, clean pattern once the tape is removed.
!
!
Drying & Revealing Your Masterpiece
The final step is allowing the towel to dry completely and revealing the stunning design beneath the tape.
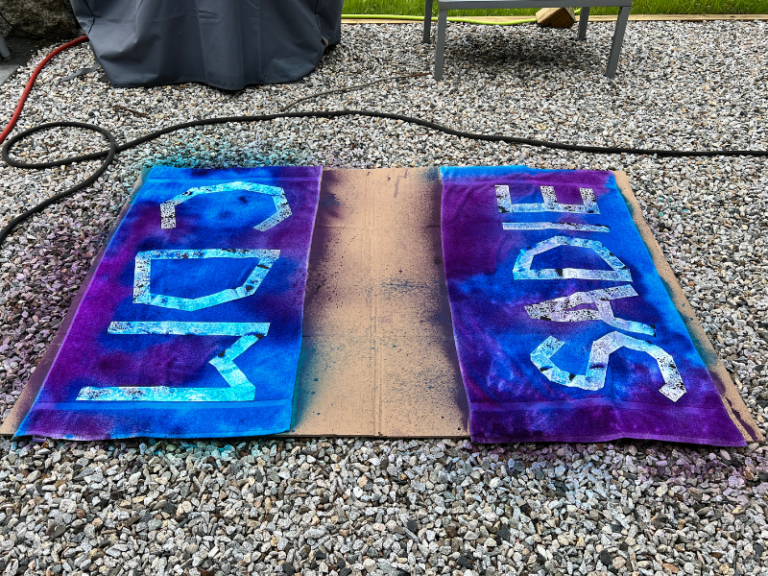
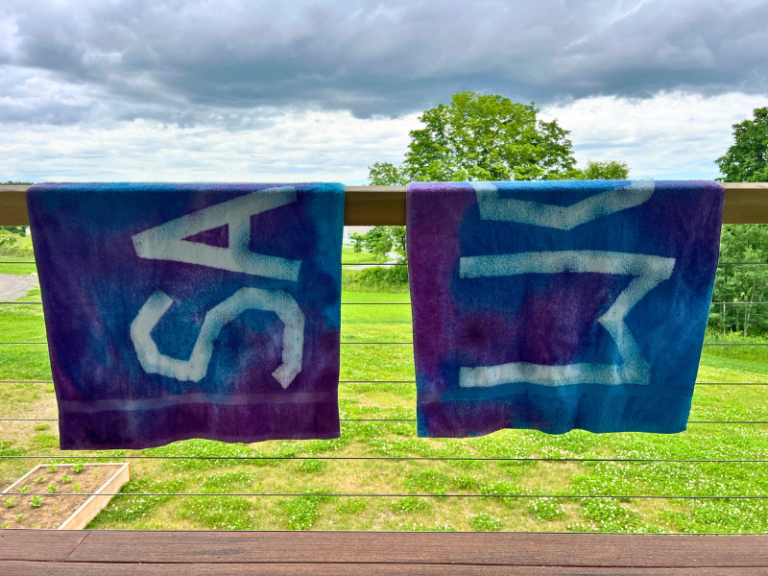
Drying Process: Once you’ve finished spraying, let the towel dry completely. You can leave it on the cardboard or transfer it to a drying rack or clothesline. Ensure adequate airflow to speed up the drying process.
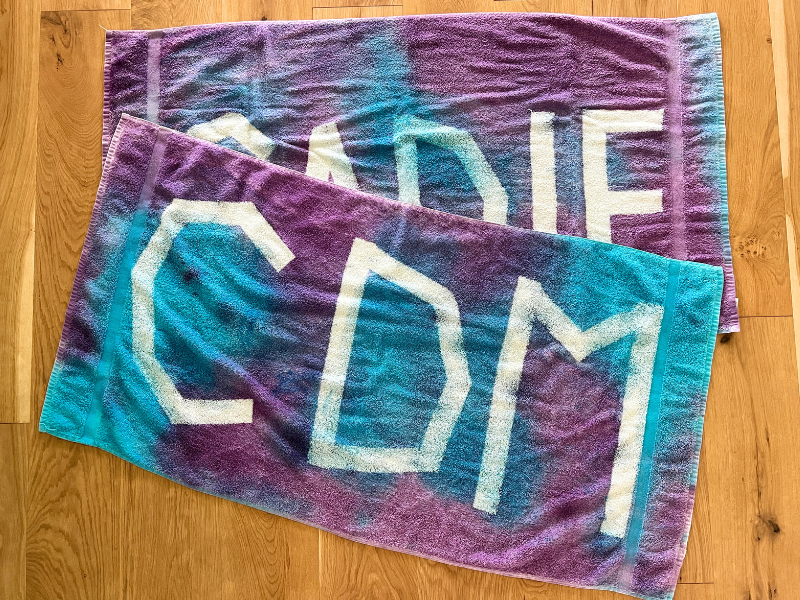
Tape Removal: Once the towel is fully dry, carefully remove the tape to reveal the beautiful pattern. Peel the tape slowly and steadily to avoid tearing the fabric.
Finishing Touches: Inspect the towel for any stray dye spots and gently wash it in cold water to remove any excess dye.
!
With a little creativity and these simple steps, you can transform ordinary towels into personalized works of art. Enjoy the process and the vibrant results! Don’t forget to explore other creative textile projects to further unleash your artistic potential.
Revamp Your Summer with Vibrant Spray-Dyed Towels
Looking for a fun and creative project to brighten up your summer days? Forget the usual beach accessories – this year, personalize your poolside experience with stunning, custom-designed spray-dyed towels! This DIY project is surprisingly simple, incredibly rewarding, and perfect for getting the whole family involved. It’s a fantastic way to add a pop of color to your summer adventures, whether you’re lounging by the pool, hitting the beach, or simply relaxing in your backyard.
Why Choose Spray Dyeing?
Traditional tie-dye is a classic, but spray dyeing offers a unique level of control and allows for more intricate designs. You can achieve gradients, stencils, and even freehand artwork, resulting in truly one-of-a-kind towels. Plus, it’s a relatively quick process, making it ideal for those spontaneous summer crafting sessions. If you’re looking for other ways to personalize your summer gear, explore our guide on creating custom beach bags: https://thetrendytype.com/personalized-beach-bags.
Gathering Your Supplies
Before you begin, gather the following materials:
White or light-colored towels: Cotton towels work best as they absorb the dye readily.
Spray dye: Choose colors that suit your style and summer aesthetic. Fiber reactive dyes are recommended for their vibrancy and washability.
Spray bottles: Several bottles will be helpful if you’re using multiple colors.
Rubber gloves: Protect your hands from the dye.
Plastic drop cloth or tarp: Cover your work surface to prevent staining.
Masking tape: For creating clean lines and stencils.
Stencils (optional): Use pre-made stencils or create your own from cardboard or acetate.
Plastic wrap or zip-top bags: For wrapping towels during the dyeing process.
Step-by-Step Guide to Spray Dyeing Towels
- Prepare Your Workspace: Lay down the plastic drop cloth or tarp to protect your work surface. Ensure the area is well-ventilated.
- Prepare the Towels: Wash and dry the towels to remove any sizing or finishes. This will help the dye adhere better.
- Apply Masking Tape (Optional): If you want to create stripes, geometric patterns, or other defined shapes, use masking tape to section off the areas you want to remain white or undyed.
- Start Spraying: Put on your rubber gloves and begin spraying the dye onto the towels. Experiment with different techniques:
Solid Coverage: Apply a consistent layer of dye for a bold, uniform color.
Ombre Effect: Start with a heavier concentration of dye at one end of the towel and gradually lighten it as you move towards the other end.
Stenciling: Place the stencil on the towel and spray over it, ensuring the dye doesn’t bleed underneath.
Splatter Effect: Create a more artistic look by lightly spritzing the dye onto the towel.
- Wrap and Let Sit: Once you’ve applied the dye, wrap the towels in plastic wrap or place them in zip-top bags. This will help keep the dye moist and allow it to fully penetrate the fabric. Let the towels sit for at least 6-8 hours, or preferably overnight.
- Rinse and Wash: Carefully remove the plastic wrap and rinse the towels under cold water until the water runs clear. Then, wash the towels in hot water with a mild detergent. This will help set the dye and prevent it from bleeding in future washes.
Ensuring Long-Lasting Color
To maximize the vibrancy and longevity of your spray-dyed towels, follow these tips:
Use Fiber Reactive Dye: These dyes bond with the fabric fibers, resulting in a more permanent and wash-resistant color.
Heat Set the Dye: After washing, you can further set the dye by ironing the towels on a high setting.
Wash Separately: For the first few washes, wash the towels separately to prevent any excess dye from bleeding onto other items.
Avoid Harsh Detergents: Use a mild detergent that won’t strip the color from the fabric.
Beyond Towels: Expanding Your Dyeing Adventures
Once you’ve mastered the art of spray dyeing towels, why not explore other creative possibilities? Consider dyeing t-shirts, tote bags, or even canvas shoes for a truly personalized summer wardrobe. For more inspiration on tie-dye techniques, check out our article on ice dyeing: https://thetrendytype.com/tie-dye-ideas-how-to-ice-dye.
Enjoy Your Colorful Creations!
Now you can enjoy your vibrant, custom-designed towels! Whether you’re heading to the beach, pool, or just relaxing in the backyard, these colorful accessories will add a fun and personal touch to your summer adventures. Don’t forget to share your creations with us on social media!
More Summer Craft Ideas
Looking for more fun and creative projects to keep you entertained this summer? Explore these ideas:
How to Tie Dye Shirts with Kids: https://thetrendytype.com/how-to-tie-dye-shirts
5 Tie Dye Ideas to Try with Your Kids: https://thetrendytype.com/how-to-tie-dye-playsilks
The post How to Spray Dye Towels for Summer appeared first on TheTrendyType.