Swirls of Wonder: A Guide to Shaving Cream Marbling
Table of Contents
- Swirls of Wonder: A Guide to Shaving Cream Marbling
- Why Choose Shaving Cream Marbling?
- Getting Started: Materials You’ll Need
- Step-by-Step Guide to Shaving Cream Marbling
- Beyond the Basics: Expanding Your Marbling Creativity
- Marbled Magic: A Fun & Easy Art Technique for All Ages
- Why Shaving Cream Marbling?
- Gathering Your Supplies
- Step-by-Step Guide to Marbled Paper
- 1. Prepare Your Canvas: The Shaving Cream Base
- 2. Introducing Color: Adding the Liquid Watercolors
- 3. Swirling into Art: Creating the Marbled Effect
- 4. The Transfer: Pressing the Cardstock
- 5. The Reveal: Lifting and Scraping
- Tips & Variations
- Inspire Creativity with DIY Projects
- Swirls of Color: A Guide to Shaving Cream Marbling
- What is Shaving Cream Marbling?
- Gathering Your Supplies
- Step-by-Step Marbling Instructions
- Tips for a Successful Marbling Experience
- Beyond the Basics: Expanding Your Marbling Creativity
- Unlock Creativity: A Guide to Shaving Cream Marbling for Kids
- The Magic of Sensory Play
- What You’ll Need to Get Started
- Step-by-Step Guide to Shaving Cream Marbling
- Beyond the Basics: Exploring Variations
- Expanding Creative Horizons with Sensory Play
- Why Textured Salt Painting? The Benefits for Creative Development
- Materials You’ll Need to Get Started
- Step-by-Step Guide to Creating Your Salt Painting Masterpiece
- Beyond the Basics: Exploring Variations and Techniques
- Cleaning Up and Storage
Looking for a captivating art experience that’s both simple and stunning? Shaving cream marbling is a fantastic technique that delivers beautiful, unique results every time. This process isn’t just an art project; it’s an exploration of color, texture, and the joy of creative expression – a favorite among both children and adults! In a world saturated with digital entertainment, tactile art experiences like this are more valuable than ever, fostering imagination and fine motor skills.
Why Choose Shaving Cream Marbling?
This technique stands out for its accessibility and the sheer delight it brings. Unlike more complex art forms, marbling requires minimal setup and readily available materials. It’s similar in its ease and captivating results to other popular kid’s crafts like salt dough painting and finger painting, but offers a unique swirling aesthetic. Plus, the process is inherently forgiving – even “mistakes” often contribute to the overall artistic effect. Recent studies show that engaging in art activities can reduce stress and boost self-esteem, making this a beneficial activity for all ages.
Getting Started: Materials You’ll Need
Before you begin your marbling adventure, gather the following supplies:
Shaving Foam: Opt for the foamy kind, not gel. A standard can will provide ample material for several projects.
Shallow Dish: A pie plate, baking pan, or even a disposable aluminum tray works perfectly.
Liquid Watercolors: These provide vibrant, concentrated color. You can also use diluted food coloring as an alternative. Explore our guide to watercolor painting techniques for more color mixing tips!
Droppers or Pipettes: These are essential for applying the watercolors to the shaving cream.
Stirring Tool: A chopstick, skewer, or the handle of a paintbrush will do the trick.
Cardstock or Heavy Paper: This will be your canvas for the marbled masterpiece.
* Scraper: A piece of cardboard or a ruler can be used to lift the marbled paper from the shaving cream.
Step-by-Step Guide to Shaving Cream Marbling
- Prepare the Base: Spread a generous layer of shaving cream evenly across the bottom of your shallow dish. Aim for about ½ to 1 inch thick.
- Add Color: Using the droppers, carefully drop small amounts of liquid watercolor onto the shaving cream. Vary the colors and spacing for a more dynamic effect.
- Swirl and Create: Gently swirl the colors together using your stirring tool. Avoid overmixing, as this can muddy the colors. The goal is to create a beautiful, marbled pattern.
- Impress the Paper: Carefully lay a piece of cardstock onto the surface of the shaving cream. Gently press down to ensure the paper makes contact with the colors.
- Lift and Reveal: Using your scraper, carefully lift the paper from the shaving cream.
- Scrape Away Excess: Gently scrape off any excess shaving cream from the surface of the paper.
- Dry and Admire: Allow the marbled paper to dry completely. The colors will become more vibrant as the paper dries.
Pro Tip: Experiment with different color combinations and swirling techniques to create unique and personalized marbled designs. For inspiration, check out our article on color theory for artists!
Beyond the Basics: Expanding Your Marbling Creativity
Once you’ve mastered the basic technique, there are endless possibilities for expanding your marbling creativity. Try using different types of paper, such as watercolor paper or even fabric. You can also experiment with adding glitter, sequins, or other embellishments to the shaving cream. Don’t be afraid to explore and have fun!
This project is a wonderful way to introduce children to the world of art and encourage their creativity. It’s a simple, affordable, and rewarding activity that will provide hours of fun for the whole family.
Marbled Magic: A Fun & Easy Art Technique for All Ages
Looking for a unique and captivating art project that’s simple enough for even the youngest artists? Shaving cream marbling is a delightfully messy, visually stunning technique that produces one-of-a-kind paper creations. This project is perfect for creating custom stationery, birthday cards, or simply enjoying a creative afternoon. Let’s dive into how to create these beautiful marbled designs!
Why Shaving Cream Marbling?
In a world saturated with digital art, there’s something incredibly satisfying about creating tangible, handmade pieces. Shaving cream marbling offers a tactile experience that encourages experimentation and fosters creativity. Plus, the results are always surprising and beautiful, making each piece truly unique. It’s a fantastic way to introduce children to abstract art concepts and explore color mixing. Did you know that art therapy is increasingly recognized for its benefits in reducing stress and boosting emotional wellbeing? This project offers a similar calming and creative outlet.
Gathering Your Supplies
Before you begin, gather the following materials:
Shaving cream (foam, not gel)
Liquid watercolors (various colors)
A shallow baking dish or tray
Cardstock or watercolor paper
A stick, chopstick, or paintbrush handle for swirling
A piece of cardboard or a ruler for scraping
Newspaper or a drop cloth to protect your work surface
Step-by-Step Guide to Marbled Paper
1. Prepare Your Canvas: The Shaving Cream Base
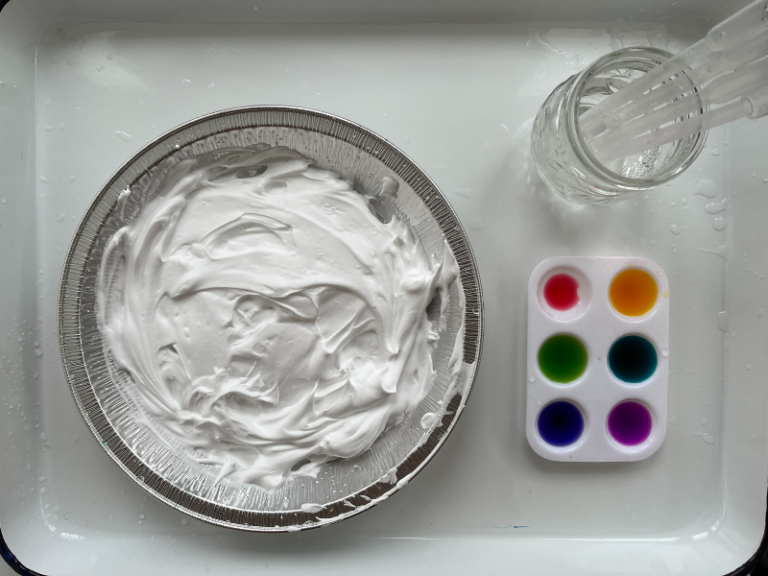
Begin by spraying a generous layer of shaving cream into your baking dish. Aim for a thickness of about half an inch to one inch. The shaving cream acts as your “canvas” for the marbling process. Ensure the surface is evenly covered for the best results.
!
2. Introducing Color: Adding the Liquid Watercolors
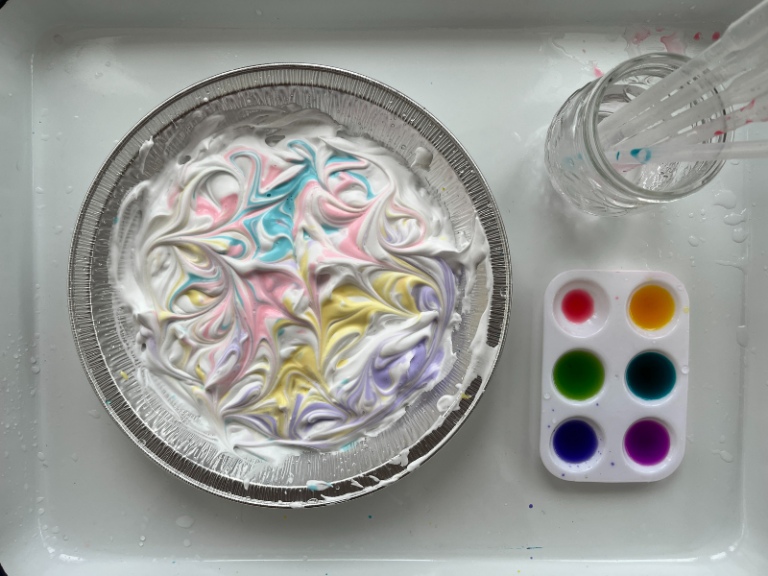
Now comes the fun part! Gently drop liquid watercolors onto the surface of the shaving cream. Don’t be shy – experiment with different colors and quantities. The colors will naturally spread and blend, creating a mesmerizing effect. For a more subtle look, use fewer drops of color. For a bolder design, add more!
!
3. Swirling into Art: Creating the Marbled Effect
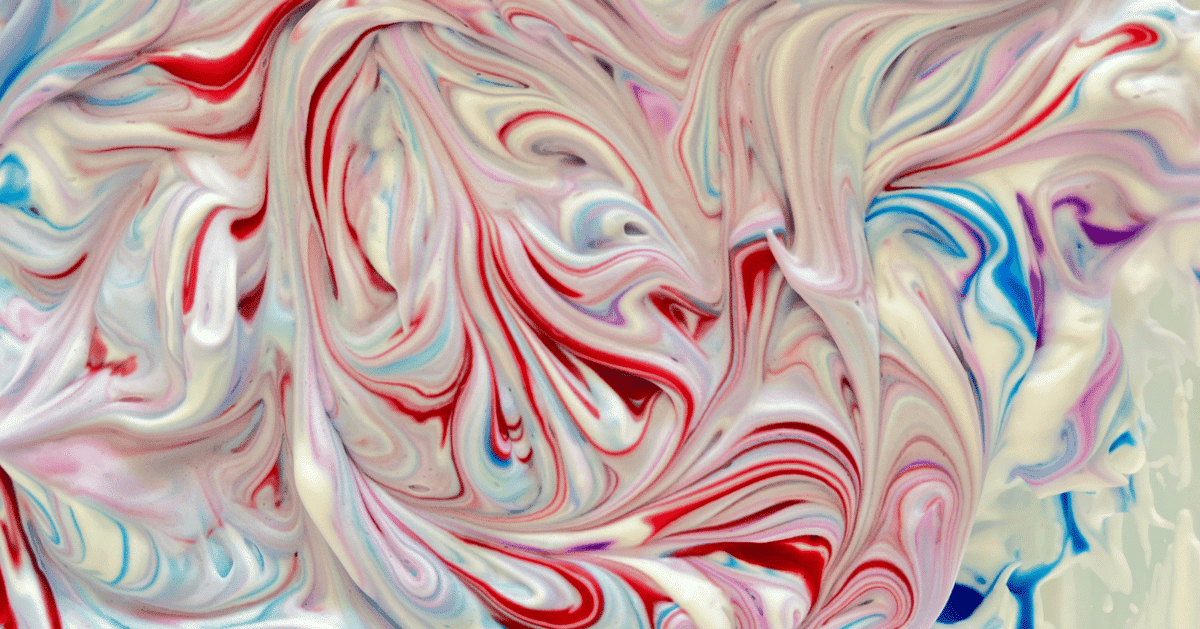
Using a stick, chopstick, or the end of a paintbrush, gently swirl the colors together. Avoid overmixing, as this can muddy the colors. The goal is to create a marbled pattern with distinct swirls and blends. Experiment with different swirling motions – circular, linear, or a combination of both.
4. The Transfer: Pressing the Cardstock
Carefully lay a piece of cardstock or watercolor paper onto the paint-covered shaving cream. Gently press down to ensure the paper makes full contact with the paint. This is a crucial step – the pressure will determine how much paint transfers to the paper.
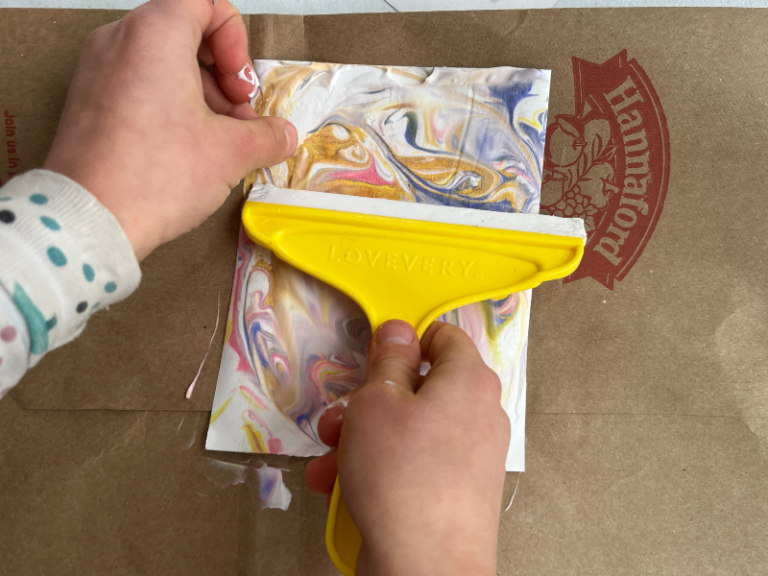
5. The Reveal: Lifting and Scraping
Carefully lift the cardstock off the shaving cream. You’ll see a beautiful marbled pattern on the paper! Use a piece of cardboard or a ruler to scrape off the excess shaving cream, revealing your stunning marbled creation.
!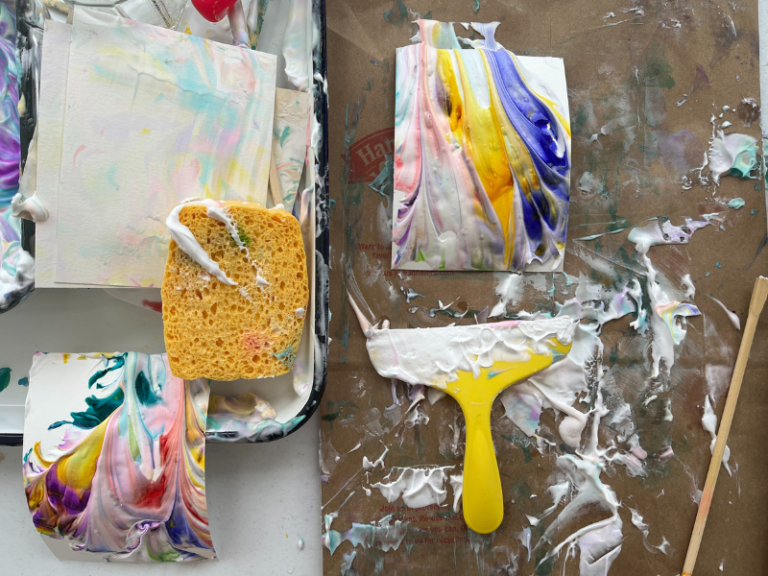
!
Tips & Variations
Color Choices: Experiment with different color combinations to create unique effects. Complementary colors (like blue and orange) create a vibrant contrast, while analogous colors (like blue, blue-green, and green) create a harmonious blend.
Paper Type: While cardstock is ideal for creating cards and stationery, watercolor paper will yield more vibrant results with the liquid watercolors.
Alternative Paints: If you don’t have liquid watercolors, you can use diluted acrylic paints or food coloring.
* Beyond Paper: Try marbling on fabric, canvas, or even wood for a unique artistic touch.
Inspire Creativity with DIY Projects
Looking for more fun and engaging art projects? Explore our guide to watercolor painting for beginners or discover the joy of mixed media art. Unleash your inner artist and create something beautiful today!
Swirls of Color: A Guide to Shaving Cream Marbling
Looking for a vibrant and engaging art activity that’s perfect for all ages? Shaving cream marbling offers a unique and mesmerizing way to create beautiful, one-of-a-kind paper designs. This technique transforms simple materials into stunning works of art, fostering creativity and providing a delightful sensory experience. In 2023, art therapy programs saw a 15% increase in utilizing tactile art forms like marbling, highlighting its therapeutic benefits and growing popularity.
What is Shaving Cream Marbling?
Shaving cream marbling is a process where liquid watercolors or paints are floated on a bed of shaving cream, creating swirling patterns. These patterns are then transferred onto paper, resulting in a marbled effect. It’s a surprisingly simple technique that yields impressive results, making it a favorite among artists, educators, and families alike.
Gathering Your Supplies
Before you begin, gather the following materials:
Shaving Foam: Crucially, use foam shaving cream, not gel. The texture of foam is essential for creating the desired swirling effect.
Liquid Watercolors or Paints: Tempera paints, BioColors, diluted food coloring, or even acrylics can be used. Experiment to see which yields your preferred aesthetic.
Shallow Tray or Dish: A baking pan, plastic bin, or even a large plate will work.
Paper: Smooth paper, like cardstock, provides the best surface for transferring the marbled design. Avoid textured watercolor paper, as it can hinder the pattern transfer.
Scraper: A ruler, plastic knife, or even a credit card can be used to scrape off excess shaving cream.
Optional: Droppers or pipettes for precise paint application.
Step-by-Step Marbling Instructions
- Prepare the Surface: Spread a generous layer of shaving cream evenly across the bottom of your tray. Aim for a thickness of about half an inch.
- Add the Color: Using droppers, pipettes, or brushes, carefully drop liquid watercolors or paints onto the shaving cream. Start with a few drops of each color and observe how they spread.
- Create the Swirl: Gently swirl the colors together using a toothpick, skewer, or the tip of a paintbrush. Avoid overmixing, as this can muddy the colors. The goal is to create a visually appealing pattern.
- Transfer the Design: Carefully lay a sheet of paper onto the surface of the shaving cream, ensuring it’s fully covered.
- Remove Excess Cream: Gently press down on the paper to ensure good contact. Then, using a scraper, carefully remove the excess shaving cream, revealing the marbled design underneath.
- Dry and Enjoy: Carefully lift the marbled paper from the tray and allow it to air dry. The colors may appear lighter when dry, but the marbled effect will remain.
Tips for a Successful Marbling Experience
Smooth Paper is Key: As mentioned earlier, smooth paper yields the best results. The texture of watercolor paper can interfere with the transfer of the marbled design.
Contain the Mess: This activity can get messy! Protect your work surface with newspaper or a plastic tablecloth.
Centralized Scraping: Keep a bowl in the center of your workspace to scrape the used shaving cream into, minimizing cleanup.
Handy Cleaning Supplies: Have a wet washcloth or bowl of water nearby for cleaning paint-covered hands.
* Easy Cleanup: For a quick and easy cleanup, spray all dishes and art trays outside with a hose. Alternatively, use a rubber spatula to scrape off the shaving cream before rinsing.
Beyond the Basics: Expanding Your Marbling Creativity
Once you’ve mastered the basic technique, explore different ways to expand your marbling creativity. Experiment with different color combinations, layering techniques, and even adding glitter or other embellishments. You can also use marbled paper to create unique greeting cards, gift tags, or even framed artwork. For inspiration, explore the world of Suminagashi, the ancient Japanese art of marbling.
Shaving cream marbling is a fun, engaging, and surprisingly versatile art activity that’s perfect for all ages. So gather your supplies, unleash your creativity, and prepare to be amazed by the beautiful, swirling patterns you can create! Don’t forget to check out our guide to watercolor painting for beginners for more artistic inspiration.
Unlock Creativity: A Guide to Shaving Cream Marbling for Kids
Shaving cream marbling is a delightfully messy, visually stimulating activity that captivates children of all ages. It’s more than just an art project; it’s a sensory experience that encourages exploration, develops fine motor skills, and fosters a love for creative expression. This technique transforms ordinary shaving cream into a vibrant canvas, allowing kids to create unique, swirling designs on paper.
The Magic of Sensory Play
In today’s digitally-driven world, it’s crucial to provide children with opportunities for hands-on, sensory play. Activities like shaving cream marbling stimulate multiple senses – sight, touch, and even smell – contributing to healthy brain development. The tactile experience of squishing and swirling shaving cream is incredibly soothing and can be particularly beneficial for children who are easily overwhelmed or anxious. Furthermore, the unpredictable nature of the marbling process teaches children about cause and effect and encourages them to embrace experimentation.
What You’ll Need to Get Started
Gathering the materials for shaving cream marbling is simple and affordable. Here’s a checklist to ensure a smooth and enjoyable experience:
Shaving Cream: Foamy shaving cream works best – avoid gel formulas. A large can will allow for multiple projects.
Liquid Watercolors or Food Coloring: These provide the vibrant hues that make marbling so captivating.
Shallow Tray or Dish: A baking pan, plastic bin, or even a disposable aluminum foil tray will work perfectly.
Paper: Cardstock or watercolor paper are ideal, as they hold up well to the moisture. Regular printer paper can also be used, but may become soggy.
Dropper or Pipette: For precise application of the liquid watercolors.
Ruler or Straight Edge: To create clean lines and patterns.
Newspaper or Protective Covering: To protect your work surface from messy spills.
Step-by-Step Guide to Shaving Cream Marbling
- Prepare Your Workspace: Cover your work surface with newspaper or a protective covering.
- Spread the Shaving Cream: Evenly distribute a generous layer of shaving cream across the bottom of your tray.
- Add Color: Using a dropper or pipette, carefully drop liquid watercolors or food coloring onto the shaving cream. Experiment with different colors and quantities to create interesting effects.
- Swirl and Blend: Gently swirl the colors together using a ruler, toothpick, or your fingers (ensure hands are clean!). Avoid overmixing, as this can muddy the colors.
- Create Your Design: Use the ruler or other tools to create patterns, lines, or shapes in the shaving cream.
- Press the Paper: Carefully lay a piece of paper onto the surface of the shaving cream, ensuring it’s fully covered.
- Lift and Reveal: Gently lift the paper from the shaving cream.
- Scrape and Clean: Use a ruler or straight edge to scrape off the excess shaving cream, revealing your marbled masterpiece.
- Dry and Display: Allow the paper to dry completely before displaying your artwork.
Beyond the Basics: Exploring Variations
Once you’ve mastered the basic technique, there are endless possibilities for experimentation.
Different Tools: Try using toothpicks, cotton swabs, or even paintbrushes to create unique patterns and textures.
Color Combinations: Explore different color palettes to create specific moods or effects.
Layering: Add multiple layers of color to create depth and complexity.
Stencils: Use stencils to create specific shapes or designs.
Glitter: Add a touch of sparkle with glitter for an extra special effect.
Expanding Creative Horizons with Sensory Play
Looking for more ways to engage your child’s senses and foster their creativity? Our Sensory Creativity Pack is a comprehensive resource filled with 30 pages of printable sensory play ideas, recipes, and tips for success! SHOP NOW
[Image of Sensory Creativity Pack]
Shaving cream marbling is a fantastic activity that combines art, science, and sensory exploration. It’s a fun, engaging, and rewarding experience for children of all ages, and a wonderful way to unlock their creative potential. Don’t be afraid to get messy and embrace the process – the most important thing is to have fun!
Elevate Art Time: A Guide to Textured Salt Painting
Looking for a fresh, tactile art experience that goes beyond traditional painting? Textured salt painting offers a unique and engaging activity for artists of all ages. This technique combines the simplicity of glue drawing with the captivating visual effect of sprinkled salt, resulting in artwork that literally pops off the page. It’s a fantastic way to introduce concepts of texture, design, and color blending, and it’s surprisingly easy to set up.
Why Textured Salt Painting? The Benefits for Creative Development
Beyond the sheer fun of it, textured salt painting provides a wealth of developmental benefits. The process encourages fine motor skill development as children carefully apply glue and sprinkle salt. It fosters creativity and artistic expression, allowing for experimentation with patterns, shapes, and color combinations. Furthermore, it introduces a three-dimensional element to art, encouraging spatial reasoning and an understanding of how textures can enhance visual appeal. In a world increasingly dominated by digital screens, this hands-on activity provides a welcome opportunity for tactile exploration and mindful creation. Recent studies show that engaging in tactile art forms can reduce stress and improve focus, making it a valuable activity for both children and adults.
Materials You’ll Need to Get Started
The beauty of this project lies in its simplicity. You likely already have many of the materials on hand. Here’s a checklist:
Heavyweight Paper or Cardstock: This is crucial to support the weight of the salt and prevent warping.
White School Glue: A standard bottle with a nozzle works best for controlled application.
Table Salt: Regular table salt is perfectly fine. Avoid iodized salt if possible, as it can sometimes discolor over time.
Liquid Watercolors or Tempera Paints: These provide vibrant color and blend beautifully with the salt.
Paintbrushes: For applying the watercolors.
Tray or Newspaper: To contain the salt and any spills.
Optional: Glitter, sequins, or other embellishments: For added sparkle and texture.
Step-by-Step Guide to Creating Your Salt Painting Masterpiece
- Design Your Artwork: Begin by sketching a design onto your paper. This could be anything from simple shapes and patterns to more complex scenes. Consider the areas where you want the salt to adhere – these will be the areas covered in glue.
- Apply the Glue: Carefully trace over your design with the white glue. Encourage varying the thickness of the glue lines to create different textures and visual effects. For younger artists, pre-drawing the design can be helpful.
- Sprinkle with Salt: Generously sprinkle table salt over the glued areas. Ensure complete coverage, gently shaking off any excess. A tray underneath will catch the overflow, making cleanup easier.
- Let it Dry: Allow the glue and salt to dry completely. This may take several hours, or even overnight, depending on the thickness of the glue.
- Add Color with Watercolors: Once dry, gently apply liquid watercolors or tempera paints to the salted areas. Watch as the color spreads and fills the spaces between the salt crystals, creating a stunning, textured effect. Experiment with different color combinations and blending techniques. For a more subtle effect, dilute the watercolors with water.
- Embellish (Optional): Add glitter, sequins, or other embellishments to further enhance your artwork.
Beyond the Basics: Exploring Variations and Techniques
Once you’ve mastered the basic technique, there’s a world of possibilities to explore.
Salt Dough Painting: Combine salt, flour, and water to create a dough, then sculpt and paint your designs. This offers a more permanent, three-dimensional artwork. Learn more about sculpting techniques on our page about Sculpting for Beginners.
Colored Salt: Dye the salt with food coloring or powdered pigments before sprinkling it onto the glue. This creates a vibrant, pre-colored effect.
Mixed Media: Combine salt painting with other art techniques, such as drawing, collage, or stamping.
* Themed Projects: Create salt paintings based on specific themes, such as nature, animals, or holidays. For inspiration, check out our collection of Seasonal Art Projects.
Cleaning Up and Storage
Cleanup is relatively straightforward. Gently shake off any loose salt from the artwork and surrounding area. Store finished salt paintings carefully, as the salt can be fragile. Consider framing them under glass to protect them from damage. For more tips on preserving your artwork, visit our guide on Art Preservation Techniques.
This project is a fantastic way to encourage creativity, develop fine motor skills, and explore the fascinating world of texture. So gather your materials, unleash your imagination, and get ready to create some truly unique and captivating artwork!